Part I of The Battle of Armageddon was presented yesterday on Roads to the Great War
 |
Diorama of the Battle of Samakh on the Shore of the Sea of Galilee That Opened the Road to Damascus
(Australian War Memorial) |
Allenby's plan for the offensive was both daring and creative, in stark contrast to the unimaginative attacks that characterized much of British operations on the Western Front. Noting the single railroad supplying the Turkish armies, Allenby correctly assessed that the seizure of El Affula and Samakh would sever Turkish lines of communications. Threatened with encirclement, the Turkish Eighth and Seventh Armies would be reduced to a single line of retreat through the Jordan Valley, a region already noted for its paucity of roads. Under attack from all his forces, Allenby believed that the Turkish forces would not be able to handle the strain and could be destroyed. Events would prove his assessment correct.
The keys to success in the coming battle would be speed, mass, and surprise. The DMC was placed right behind XXI Corps, thanks in large part to lessons learned on the Western Front. As Chauvel's biographer noted, "Operations in France had shown how important it was to position cavalry well forward to move through a gap as soon as it was cleared." Insistent on speed and mobility, Allenby directed that the cavalry not get bogged down in local actions but instead stay massed for a decisive blow against the enemy's main body. Paralyzing the Turkish forces would assist the DMC in achieving its objectives. The EEF's deception plan was consequently an elaborate design, including dummy horses and empty tents lining the Jordan Valley. On the eve of battle–set to launch on 19 September–Allenby was confident that he had confounded von Sanders. "That the enemy expected an offensive on my part about this date is probable. That he remained in ignorance of my intention to attack in the coastal [sector] with overwhelming numbers is certain."
Integral to the entire campaign plan would be the RAF's accomplishments. With one squadron attached to each corps, Allenby depended on his air assets to accomplish a number of diverse missions–strategic and tactical reconnaissance, artillery cooperation, protection from hostile aircraft, and aerial bombing. Prior to the attack's start, 400 square miles of country were photographed and mapped, while fighters ran security missions to allow for the secret concentration of forces building up on the coastal plains. Thus, not only had Allenby planned for an operation in-depth, he had also fully integrated the air piece to ensure the battle was truly three-dimensional. Correctly assessing that the Turkish centers of gravity lay in their rail transport and command and communications sites, the EEF commander was about to exploit the full spectrum of combat multipliers against a demoralized enemy. As Allenby's biographer, Archibald Wavell, contended, the battle had "been practically won before a shot was fired."
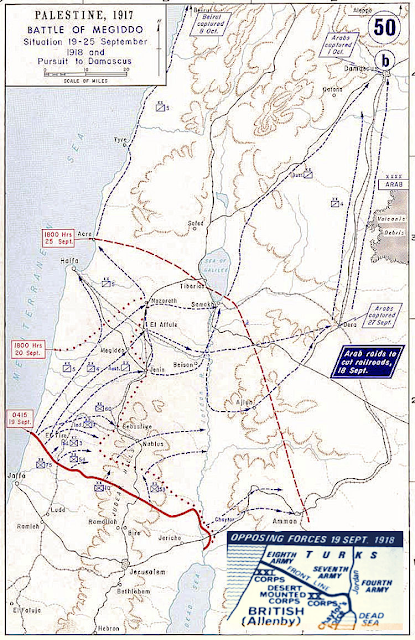
Click on Map to Enlarge
The Opening
The first shots of the Megiddo battle would not be fired by Allenby's ground forces but instead by the Arab Northern Army operating on the eastern flank. Supported by a flight of British airplanes and an armored car squad, the Arabs attacked railway lines and station buildings at Dera beginning on 16 September. RAF bombing runs affected Turkish morale as much as railway traffic, while Arab raids, led by the energetic Col T. E. Lawrence, created havoc along enemy communication lines. Lawrence would later note that the "Turks' hopeless lack of initiative made their army a "directed" one so that by destroying the telegraphs, we went far towards turning them into a leaderless mob." Von Sanders reacted as expected, sending reinforcements from the coastal city of Haifa east toward Dera. Then, with the enemy command center distracted and soon to be completely cut off from the front lines, Allenby unleashed his modern-day version of Armageddon.
At 0430 on 19 September, 435 artillery guns and trench mortars–approximately one gun every 50 yards– opened up a 15-minute bombardment on Turkish positions along the coastal flank. Along this critical 15- mile sector, the EEF had massed 35,000 infantry and 9,000 cavalry troops against 8,000 Yilderim infantrymen. The night before, XX Corps launched its diversionary attack toward the Jordan River Valley, while just after midnight a Handley-Page bomber dropped 1,200 pounds of bombs on the El Affula aerodrome, railway station, and telephone exchange. Von Sanders later noted that all "telephonic and telegraphic communication between the Army Group and the armies was completely broken from the beginning of the attack." As Bulfin's infantry swept forward 15 minutes after the start of the artillery barrage, the Turkish command was unaware of the main attack's weight and scope.
 |
| Retreating Turkish Column Utterly Destroyed in the Advance |
With the main line quickly broken by the combined shock of artillery and machine gun fire, the Desert Mounted Corps rushed through the breach. One squadron commander from the 19th Lancers described the elation at the cavalry's exploitation. "As we cleared the Turkish trenches and rode unopposed through the debris of defeat, we all felt that the 'G' in 'GAP' for which we had waited patiently [in France] for years had at last been reached." By midday, the Turkish Eighth Army was in shambles, and Chauvel's DMC had captured Tul Karm.
All this was unknown to von Sanders, for the RAF had paralyzed Turkish nerve centers through a well-executed bombing plan. By 20 September cavalry forces supported by armored cars had cleared Megiddo, 44 miles from the jump-off line, as XX and XXI Corps kept constant pressure on the retreating Turkish armies. By nightfall on the 20th, the escape routes at El Affula, Beisan, and Dera, across the Jordan were shut down by Allenby's ground forces and the Arab Northern Army.
On the morning of the third day, an Australian Bristol bomber found the Turkish Seventh Army attempting to retreat northward through the Wadi Fara near Nablus. A steep gorge, the wadi formed a natural canal in which thousands of infantry, cavalry, and transport troops became trapped. Knocking out front and rear vehicles and thus sealing the gorge, Bristols and DH-9s and SE-5a aircraft began strafing and bombing runs that lasted throughout the day. The account of one Australian squadron described the scene of destruction.
"The long, winding, hopeless column of traffic was so broken and wrecked, so utterly unable to escape from the barriers of hill and precipice, that the bombing machines gave up all attempt to estimate the losses under the attack and were sickened at the slaughter."
 |
| Chaytor's Force Occupies Es Salt, East of the Jordan River |
By the end of 21 September, the Turkish Seventh Army ceased to exist as a capable fighting force. Within 36 hours of the start of the offensive, the major British objectives had been attained. The Turkish Eighth and Seventh Armies were threatened with envelopment and destruction by strong mobile forces to their rear. With few available reserves and his communication net crumbling, von Sanders had little opportunity to influence the battle. He attempted to order his forces to retreat, but only the Fourth Army could even be contacted. It was too late to save all but a corporal's guard of the Seventh and Eighth Armies, as these two formations disintegrated under the strain.
Despite the utter devastation created by his air and ground forces, Allenby continued to press. Chauvel forwarded orders to the 5th Cavalry Division to seize Haifa, which it did on 23 September after heavy fighting in rough terrain during which Indian troops of the 15th Cavalry Brigade distinguished themselves. Two days later Chaytor's force fought its way into Amman. Meanwhile, the combination of Chaytor's Force and the Arab Army had severely damaged the Fourth Army. In six days Allenby had brought about the complete collapse of the Ottoman forces. He chose the name of Megiddo to signify this victory, as the nearby ancient fortress of Tel Megid appears in the Bible as Armageddon, the location of the final battle between the forces of good and evil.
Victory Exploited
 |
| RAF Aircraft Over the Sea of Galilee Heading to Damascus (Sidney W. Carline, 1919) |
Despite the defeat of the 7th and 8th Ottoman Armies, elements of the Ottoman 4th Army were deployed away from the destruction at Sharon and Nablus and still posed a risk. Learning of the losses at those battles, they retreated northward. Allied aircraft again caused heavy losses on the retreating troops.
The continued pursuit northward was aided by Lawrence and the Arabs, who, after capturing Dera, cut the lines of retreat of the Turkish 4th Army. Cavalry divisions from the DMC were thus able to sustain the chase while the Arabs secured the flanks. Air-ground cooperation continued during the pursuit Damascus, with RAF motorcars accompanying lead units of the DMC. Lorries carrying fuel and stores followed closely behind, allowing air assets to keep pace with the fast-moving cavalry.
As the last desperate elements of the 4th Army reached Ziza they found their path blocked by the ANZAC Mounted Division. Pursued by Arab irregulars embittered by years of occupation, they surrendered en masse to the Anzacs rather than face slaughter at Arab hands. In the entire battle, the Allies had inflicted losses on the Ottomans of over 25,000 killed, wounded, or captured, effectively ending their ability to continue the war.
To the west at the south end of the Sea of Galilee, just before dawn on 25 September, mounted troops approached the rail junction of Samarkh. (See illustration at top of the page.) The advance units received heavy fire. Reforming, the 11th Light Horse Regiment attacked the eastern end of the town and two squadrons of the 12th Light Horse attacked the western end. Samarkh was secured by 0500 with 365 prisoners taken—half of them German. Once the 4th Australian Light Horse Brigade occupied Samakh, the last Turkish stronghold and communications center west of the Jordan was eliminated. For Allenby's forces the way to Damascus, Beirut, and Aleppo now lay open. The remaining Turks were now in headlong retreat, and Chauvel's telegraphic orders on 26 September disclosed that Allenby had revised his battle plans beyond the enemy's annihilation. "Seventh and Eighth Turkish Armies have been destroyed. Fourth Army is retreating on Damascus via Dera. Desert Mounted Corps will move on Damascus."
Ottoman stragglers who had escaped the destruction at Megiddo continued to filter north in the hope of regrouping. What followed was one of the most remarkable military pursuits in history. Chauvel led the DMC northward, covering over 100 miles (160 km) in three days and crossing the Golan Heights.
 |
| Desert Mounted Corps Crossing the Golan Heights |
One subaltern with the 18th Lancers noted the swath of destruction created by the far-reaching cavalry and aircraft. "We had covered 80 miles in 34 hours. What a sight the roads were! Abandoned lorries and cars, cut off in their attempt to escape, stood every few yards on the road. . . El Affula was a shambles. Engines and trains full of army winter clothing and kits stood in the stations, just as they were surprised that morning."
On the morning of 1 October, the most advanced unit, the 3rd Australian Light Horse Brigade, entered Damascus in pursuit of fleeing Ottoman troops. They accepted the city's formal surrender, much to the annoyance of Lieutenant-Colonel T.E. Lawrence, who had planned a grand ceremony in support of the Arab insurgents' claim to self-rule.
With Damascus occupied in force, Allenby was yet again able to set his sights northward—this time to Aleppo, 200 miles north of Damascus. Meanwhile, the 3rd Indian Division headed to Beirut and the 7th Indian Division towards Baalbek. Homs was also captured, on 16 October.
As an illustration of the depth of the EEF's striking power, the 5th Cavalry Division had marched approximately 550 miles in just under 40 days. Though the final pursuit depleted the strength of the cavalry's men and horses, by the end of October the final shots of the war in the Middle East were fired at Haritan, just outside the limits of Aleppo. Five days later the Turks signed an armistice and the 600-year-old Ottoman Empire was subsequently partitioned.
 |
| Indian Lancers Entering Damascus |
From the opening of the Megiddo battle to the armistice, the EEF captured 75,000 prisoners, 360 artillery pieces, and 800 machine guns. For its efforts, the EEF suffered 5,666 casualties, though of those only 853 were killed in action. As Matthew Hughes contended, the "completeness of the victory at the battle of Megiddo surprised [even] Allenby." In a letter to his wife, Allenby wrote that he was "almost aghast at the extent of the victory." Indeed, it had been one of the most decisive battles fought in World War I, causing the ruination of three Turkish armies and the capitulation of an empire.
Sources: Our articles on Allenby's 1918 campaign have quoted extensively from two studies, "Deep Battle in World War One: The British 1918 Offensive in Palestine," by Lt. Cmdr. Paul A. Povlock of the Naval War College, and "Armageddon’s Lost Lessons: Combined Arms Operations in Allenby’s Palestine Campaign," by Lt. Col. Gregory Daddis of the U.S. Military Academy. Maps from the West Point Atlas and the British Army Museum.

Fantastic article. Thank you!!
ReplyDelete