Now all roads lead to France and heavy is the tread
Of the living; but the dead returning lightly dance.
Edward Thomas, Roads

Tuesday, January 9, 2024

Asleep in the Deep: Nursing Sister Anna Stamers and the First World War


By Dianne Kelly
Goose Lane Editions,  2021
Reviewed by Jim Gallen


This Titled Can Be Ordered HERE

Roads To the Great War sheds light on all facets of the Great War: the famous and heroic, the overlooked but crucial.  Asleep in the Deep is the story of the Canadian Army Medical Corps (CAMC), loosely told through the experience of Nursing Sister Anna Stamers of St. John, New Brunswick.  Two years after graduation from Saint John School of Nursing, Stamers was one of 50 CAMC nurses to sail from Montreal on 4 June 1915, arriving at Plymouth, England, on 13 June after an uneventful crossing.  

On 2 July 1915, Anna began eight months at her first assignment at Moore Barracks near Folkestone, Kent. However, as Canadian troops became committed to battle in France, CAMC established two Canadian Casualty Clearing Stations (CCCS): Canadian Stationary Hospital (CSH) No. 1 and Canadian General Hospital (CGH) in France.  Anna was one of nine Canadian nursing sisters arriving at CGH near Etaples on 19 February 1916.  

Though ostensibly protected by the Hague Convention, medical corps were targets.  On 25/26 April 1916, a zeppelin attack dropped two bombs directly on No. 1 CGH. Anna was not involved in this bombing, but since she had spent over a year treating Canadian casualties from Mount Sorrel outside Ypres, the Somme, and Vimy Ridge, she was granted leave, departing from Liverpool for Canada on 9 June 1917. This was a worrisome voyage, as the threat from U-boats was much greater than it had been in 1915. While in Canada, returning nursing sisters like Anna were called on to give speeches on conditions in France and to attend patriotic events.

Returning to England, Anna was posted to No. 16 CGH in Orpington by 12 October 1917.  Many of her patients had already received treatment in France, and many would be sent back to Canada on hospital ships. Perhaps as a natural sequence in her service, Anna was transferred to the Canadian hospital ship Llandovery Castle, in March 1918. Despite special protection under the 1907 Hague Convention, to which Germany, Britain, and all the naval powers were signatories, observance of this protection varied over time and among officers.  

Article 1 of the Convention stipulated that hospital ships were not to be used for any other purpose. Claims that they were used for transportation of troops or war materials and for observation menaced vessels of both sides. After sinking a half-flotilla of German minelayers on 17 October 1914, the British captured the German hospital ship Ophelia on the claim, upheld by the Prize Court, that it was acting as a signaling ship and had never attempted to act as a hospital ship. The Ophelia precedent would be cited by Germany to justify actions against British hospital ships for the rest of the war.  


Two "Blue Birds" As Canadian Nurses Were Called

After 4 February 1915, all ships in the war zone around Britain and Ireland were declared subject to German attack, although hospital ships were to be spared; they were only to be attacked when they were obviously used for the transport of troops from England to France.  On 1 February 1915, a German torpedo narrowly missed the British hospital ship Asturias. In 1916, the Russian hospital ship Portugal was torpedoed by U-33 in the Black Sea as was Portugal’s replacement, Vpered. British hospital ships torpedoed included HMHS Gloucester Castle, HMHS Asturias, HMHS Lanfranc, HMHS Donegal, and HMHS Britannic.

Given the precedent, Anna knew she was undertaking hazardous duty when she boarded Llandovery Castle.  On 27 June, after seven nights at sea, a torpedo from U-86 struck the ship at 9:30 p.m., sinking her in ten minutes. The explosion destroyed the wireless room and prevented the crew from sending a distress call. Witnesses claimed that seven lifeboats made it safely into the sea. One was sucked into the whirlpool created by the sinking ship, and two others capsized. The captain’s lifeboat was rescued after 36 hours at sea. A British sloop and four American destroyers continued the search, yielding only one lifeboat.

Many massacres have survivors. Major Thomas Lyon, a Canadian surgeon, testified the U-boat commander took him and Captain Sylvester of Llandovery Castle aboard for questioning.  Then the U-boat went on “a smashing up cruise among the survivors and by hurling it hither and thither he succeeded in ramming and sinking all the boats and rafts except one…which escaped.  The survivors in this boat heard the sound of gunfire behind them for some time.”

The sinking of the Llandovery Castle became part of the Allies’ propaganda war and forced a change in hospital ship practice. After the sinking, hospital ships proceeded as ordinary transports, with no distinguishing markings, armed, and with naval escorts. A trial for war crimes was held in 1920 against Helmut Patzig, commander of U-86. His conviction was quashed in a general amnesty in 1931, and he served as a U-boat commander from 1943 to 1945.


Anna Stammers was killed in the sinking and
is commemorated in her home province of
New Brunswick.


Roads readers will appreciate this 222-page book for its insights into the Canadian Army Medical Corps in the Great War and for the shocking details of the perils of hospital ships.  As Nurse Stamers left neither diary nor first person narratives, author Dianne Kelly was forced to rely on newspaper articles, military records, or writings of others from which Stamers’ location and actions could be determined or inferred. The focus of this book is the nurses of the CAMC, with Nurse Stamers serving to provide a connection to qualify the book for The New Brunswick Military History Series, of which it is a part.  Asleep in the Deep has earned its niche in the medical history of the Great War.

Jim Gallen


Monday, January 8, 2024

Poland's Tadeusz Kościuszko Mound: Connecting the American Revolution, Poland, and the Great War


General Tadeusz Kościuszko

Thaddeus Kościuszko (1746–1817), was a Polish general, military engineer, and revolutionary. He fought in the American Revolutionary War, as well as an uprising in his home country. He was known for his bravery, kindness, patriotism, likeability, and unwavering strength of character.

Late in August 1776, Thaddeus Kościuszko stepped off a ship and onto the docks in Philadelphia, Pennsylvania. After making the acquaintance of Benjamin Franklin and proving his worth by designing blockades and fortresses along the Delaware River, Kościuszko was given the rank of colonel by Congress in October 1776. In December, he designed Fort Mercer in Red Bank, New Jersey. In the summer of 1777, he ordered the troops retreating from Ticonderoga to delay the British by felling trees and moving boulders onto the path, as well as diverting and damming streams to turn the woodland path into a swamp. In the autumn of 1777, Kościuszko’s structures and use of topography contributed to the American victory at Saratoga.

Reaching Fort West Point in New York in March 1778, Kościuszko heavily fortified the base, as well as the section of the Hudson River that it overlooked. It was here that he met the witty and charismatic Agrippa Hull, a black New-Englander who would accompany Kościuszko for the rest of the war as his servant, assistant, and companion.

Finally leaving West Point late in the summer of 1780, the engineer traveled south to meet up with his friend and mentor, General Horatio Gates. Gates, however, was soon replaced by General Nathanael Greene, whom Kościuszko would serve for the rest of the war. As the British general Lord Cornwallis chased Greene’s forces around the Carolinas, Kościuszko proved himself invaluable by leading the troops through shortcuts and building a fleet of small boats which could be used to transport supplies and soldiers across rivers.


The Tadeusz Kościuszko Mound, Krakow, Poland


In June 1781, while attempting to burrow closer to an enemy fort known as “Ninety-Six,” Kościuszko was bayoneted in the buttocks while inspecting his trench. He soon recovered from the criticism of his failed plan, as well as the embarrassment from his wound. In early autumn 1782, as the war was drawing to a close, Kościuszko was made a field commander. On November 14, Kościuszko led a skirmish outside Charleston, South Carolina, one of the last military skirmishes of the American Revolutionary War. After nine years away from his homeland, Thaddeus Kościuszko returned to Poland in September 1784.

For a few years, he lived simply and alone on his remote farm while Poland and other parts of Europe underwent significant political changes. Weary of Russian domination, and inspired by the American Revolution, Poland began to strengthen its army, and on 3 May 1791, it passed a new constitution. It is generally considered the second national constitution in history, the first being that of the United States.

Tensions eventually broke with the Russians, and Kościuszko, who had been given the title of major general in 1789, fought a year-long war for Poland's freedom. However, the Russian army was too strong, and in late July 1792, the Polish King Stanislaw surrendered to Tsaritsa Catherine the Great. Kościuszko left Poland, as did many other leaders who fought against the Russians.
 
After spending over a year in western Europe, planning and gathering support, the revolutionaries re-entered Poland in March 1794, prepared to set off a fiery rebellion. Kościuszko was proclaimed commander in chief of Poland and chosen to lead the uprising. Leading his patchwork army—soldiers armed with guns and peasants armed with farming tools—the Polish army waged a battle with a Russian force near the village of Raclawice. The Polish army overpowered the unprepared Russian forces. The scythe-bearing peasants also brought an element of psychological warfare to the Polish army: with their long scythes and fierce war cries, they reminded the Czarina’s troops of the mythical grim reaper from folktales. Soon, people in cities all over Poland rose up to force out the occupying Russian soldiers, pledging their allegiance to Kościuszko.

However, Poland’s triumph was short-lived. An unexpected collaboration between the Russian and the Prussian armies defeated and demoralized the Polish army at the Battle of Szczekociny in June 1794. On 15 June, Krakow fell to the Prussians. All efforts turned to defending Warsaw. A combined Russian and Prussian army lay siege to the capital city throughout the summer, but the Polish forces and the city’s inhabitants managed to stave them off until they retreated in September.

Click to Enlarge
Inside the Complex

On 10 October 1794 the Polish army engaged the tsaritsa' soldiers. Massively outnumbered, the Polish forces lost the battle. Kościuszko himself was badly wounded and captured. He was taken to St. Petersburg, where he was imprisoned in the Peter and Paul Fortress on 10 December 1794. After his release he returned to America for two years, and spent the rest of his life in Europe. He notably put in an appearance at the Congress of Vienna to advocate Polish independence, but his efforts came to nought. The beloved hero of both America and Poland died in Switzerland in 1817.

Upon his passing, Polish authorities demanded his body be sent from Switzerland to be interred in the Wawel Royal Crypts. Such was the love for Kościuszko that the people proposed to honor him with a monument in the tradition of the prehistoric mounds of King Krak and Wanda—and to make it the grandest in Kraków. With the approval of the Norbertine Sisters, who granted the land, city authorities began developing an artificial burial mound to be constructed atop Bronisława Hill in Zwierzyniec. When construction began there was no lack of pomp and ceremony. First mass was held, followed by speeches; documents, heirlooms and artifacts from Kościuszko’s illustrious life were placed—as well as soil from his many battlefields, including those in America—before friends, statesmen and foreign dignitaries dumped the first wheelbarrows of dirt. For the next three years people of all ages from all over Poland brought soil from their villages to add to the mound. Though a committee was formed for its oversight, the work was all done voluntarily. Officially completed in November 1823, Kościuszko Mound stands 34 meters high, 326 meters above sea level, and on a clear day the Tatra Mountains can be seen from the top.

In the 1850s, the occupying Austrian military authorities built a brick fortress around the mound, which they used as a strategic lookout point. Demolishing a chapel of St. Bronisława at the site, the thoughtful Austrians actually built a new chapel, incorporating it into the stronghold. In 1860, a granite boulder with the inscription: "Kościuszko" was placed on the top.


Warsaw—Atop the Mound in Krakow—Washington, DC


WWI: The Battles of Krakow, November–December 1914

At the outbreak of World War I, the Austro-Hungarian Army removed the memorial stone and set up an observation point on the top of the mound. The mound served this valuable role during the fall 1914 battles just east of Krakow.  Never placed under direct fire of the enemy, it proved and ideal site for launching observation balloons. The result of the fighting was to halt the early successful southern Russian advance to the west and drive their forces out of Galicia permanently.

The Germans later threatened to entirely level the mound and surrounding fortifications during their WWII occupation as they set about destroying all Polish monuments and national symbols (along with three million Polish Jews). Though parts of the fortress were destroyed, the complex has been restored and significant engineering improvements have been made to the Kościuszko Mound to ensure its longevity.


Sources: Krakow City Guide; Malopolska: The First World War Eastern Front Trail; National Park Service Publications.


Sunday, January 7, 2024

What Ever Happened to Alexander von Kluck?


General  Alexander von Kluck (1846–1934)  held the most important field command of the German Army in the opening days of World War I. Known to be a very arrogant and unapproachable general officer, he was also the only German commander during war who had never served on the Great General Staff or attended the Prussian War Academy. 

When war came, though, it was von Kluck's First Army that was designated to spearhead the German invasion of France and Belgium on the extreme right of the great sweeping movement.  In doing so, he showed tremendous vigor for a man of 68 years.  While his efforts were thwarted strategically by the inherent flaws of the Schlieffen Plan, and tactically by the caution and pessimism of the Second Army commander on his left flank, General Karl von Bulow,  his decision-making as the Battle of the Marne unfolded has been consistently criticized by most historians.  Nevertheless, he retained his field command afterward.

Yet, by the middle of the war, he was nowhere in sight.  As it turns out, he was a casualty of the war. In  late March1915, he  received a severe shrapnel wound in his leg  while inspecting his front lines. He received the order of the Pour le Mérite  from the Kaiser himself as he lay on his sickbed. Von Kluck retired from military service in early 1916. His postwar memoirs, The March on Paris and the Battle of the Marne, were published in 1920. The general died on 19 October 1934 in Berlin. He is buried at the Südwestkirchhof in Stahnsdorf.

Sometime during the war, von Kluck, gained a bit of immortality when his name was incorporated into a bawdy British soldiers' song:

"Kaiser Bill is feeling ill,

The Crown Prince he's gone barmy.

We don't give a fuck for old von Kluck

And all his bleedin' army."

Sources:  Who's Who in World War One; Prussianmachine.com; Library  of Congress

Saturday, January 6, 2024

The Battle of Armageddon, Part II


Part I of The Battle of Armageddon was presented yesterday on Roads to the Great War

Diorama of the Battle of Samakh on the Shore of the Sea of Galilee That Opened the Road to Damascus
(Australian War Memorial)


Allenby's plan for the offensive was both daring and creative, in stark contrast to the unimaginative attacks that characterized much of British operations on the Western Front. Noting the single railroad supplying the Turkish armies, Allenby correctly assessed that the seizure of El Affula and Samakh would sever Turkish lines of communications. Threatened with encirclement, the Turkish Eighth and Seventh Armies would be reduced to a single line of retreat through the Jordan Valley, a region already noted for its paucity of roads. Under attack from all his forces, Allenby believed that the Turkish forces would not be able to handle the strain and could be destroyed. Events would prove his assessment correct.

The keys to success in the coming battle would be speed, mass, and surprise. The DMC was placed right behind XXI Corps, thanks in large part to lessons learned on the Western Front. As Chauvel's biographer noted, "Operations in France had shown how important it was to position cavalry well forward to move through a gap as soon as it was cleared." Insistent on speed and mobility, Allenby directed that the cavalry not get bogged down in local actions but instead stay massed for a decisive blow against the enemy's main body. Paralyzing the Turkish forces would assist the DMC in achieving its objectives. The EEF's deception plan was consequently an elaborate design, including dummy horses and empty tents lining the Jordan Valley. On the eve of battle–set to launch on 19 September–Allenby was confident that he had confounded von Sanders. "That the enemy expected an offensive on my part about this date is probable. That he remained in ignorance of my intention to attack in the coastal [sector] with overwhelming numbers is certain."

Integral to the entire campaign plan would be the RAF's accomplishments. With one squadron attached to each corps, Allenby depended on his air assets to accomplish a number of diverse missions–strategic and tactical reconnaissance, artillery cooperation, protection from hostile aircraft, and aerial bombing. Prior to the attack's start, 400 square miles of country were photographed and mapped, while fighters ran security missions to allow for the secret concentration of forces building up on the coastal plains. Thus, not only had Allenby planned for an operation in-depth, he had also fully integrated the air piece to ensure the battle was truly three-dimensional. Correctly assessing that the Turkish centers of gravity lay in their rail transport and command and communications sites, the EEF commander was about to exploit the full spectrum of combat multipliers against a demoralized enemy. As Allenby's biographer, Archibald Wavell, contended, the battle had "been practically won before a shot was fired."


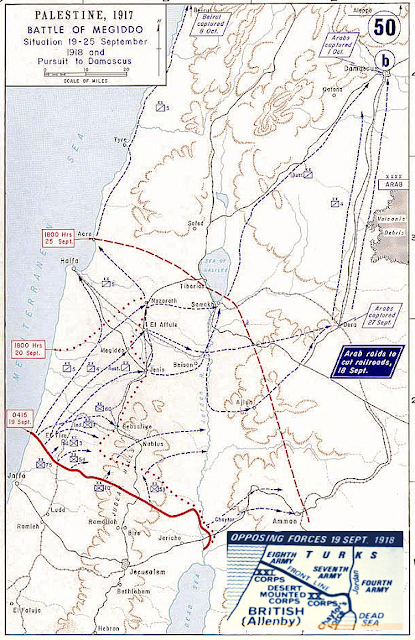
Click on Map to Enlarge


The Opening

The first shots of the Megiddo battle would not be fired by Allenby's ground forces but instead by the Arab Northern Army operating on the eastern flank. Supported by a flight of British airplanes and an armored car squad, the Arabs attacked railway lines and station buildings at Dera beginning on 16 September. RAF bombing runs affected Turkish morale as much as railway traffic, while Arab raids, led by the energetic Col T. E. Lawrence, created havoc along enemy communication lines. Lawrence would later note that the "Turks' hopeless lack of initiative made their army a "directed" one so that by destroying the telegraphs, we went far towards turning them into a leaderless mob." Von Sanders reacted as expected, sending reinforcements from the coastal city of Haifa east toward Dera. Then, with the enemy command center distracted and soon to be completely cut off from the front lines, Allenby unleashed his modern-day version of Armageddon.

At 0430 on 19 September, 435 artillery guns and trench mortars–approximately one gun every 50 yards– opened up a 15-minute bombardment on Turkish positions along the coastal flank. Along this critical 15- mile sector, the EEF had massed 35,000 infantry and 9,000 cavalry troops against 8,000 Yilderim infantrymen. The night before, XX Corps launched its diversionary attack toward the Jordan River Valley, while just after midnight a Handley-Page bomber dropped 1,200 pounds of bombs on the El Affula aerodrome, railway station, and telephone exchange. Von Sanders later noted that all "telephonic and telegraphic communication between the Army Group and the armies was completely broken from the beginning of the attack." As Bulfin's infantry swept forward 15 minutes after the start of the artillery barrage, the Turkish command was unaware of the main attack's weight and scope.


Retreating Turkish Column Utterly Destroyed in the Advance


With the main line quickly broken by the combined shock of artillery and machine gun fire, the Desert Mounted Corps rushed through the breach. One squadron commander from the 19th Lancers described the elation at the cavalry's exploitation. "As we cleared the Turkish trenches and rode unopposed through the debris of defeat, we all felt that the 'G' in 'GAP' for which we had waited patiently [in France] for years had at last been reached." By midday, the Turkish Eighth Army was in shambles, and Chauvel's DMC had captured Tul Karm.

All this was unknown to von Sanders, for the RAF had paralyzed Turkish nerve centers through a well-executed bombing plan. By 20 September cavalry forces supported by armored cars had cleared Megiddo, 44 miles from the jump-off line, as XX and XXI Corps kept constant pressure on the retreating Turkish armies. By nightfall on the 20th, the escape routes at El Affula, Beisan, and Dera, across the Jordan were shut down by Allenby's ground forces and the Arab Northern Army.

On the morning of the third day, an Australian Bristol bomber found the Turkish Seventh Army attempting to retreat northward through the Wadi Fara near Nablus. A steep gorge, the wadi formed a natural canal in which thousands of infantry, cavalry, and transport troops became trapped. Knocking out front and rear vehicles and thus sealing the gorge, Bristols and DH-9s and SE-5a aircraft began strafing and bombing runs that lasted throughout the day. The account of one Australian squadron described the scene of destruction.

"The long, winding, hopeless column of traffic was so broken and wrecked, so utterly unable to escape from the barriers of hill and precipice, that the bombing machines gave up all attempt to estimate the losses under the attack and were sickened at the slaughter."


Chaytor's Force Occupies Es Salt, East of the Jordan River


By the end of 21 September, the Turkish Seventh Army ceased to exist as a capable fighting force. Within 36 hours of the start of the offensive, the major British objectives had been attained. The Turkish Eighth and Seventh Armies were threatened with envelopment and destruction by strong mobile forces to their rear. With few available reserves and his communication net crumbling, von Sanders had little opportunity to influence the battle. He attempted to order his forces to retreat, but only the Fourth Army could even be contacted. It was too late to save all but a corporal's guard of the Seventh and Eighth Armies, as these two formations disintegrated under the strain.

Despite the utter devastation created by his air and ground forces, Allenby continued to press. Chauvel forwarded orders to the 5th Cavalry Division to seize Haifa, which it did on 23 September after heavy fighting in rough terrain during which Indian troops of the 15th Cavalry Brigade distinguished themselves. Two days later Chaytor's force fought its way into Amman. Meanwhile, the combination of Chaytor's Force and the Arab Army had severely damaged the Fourth Army. In six days Allenby had brought about the complete collapse of the Ottoman forces. He chose the name of Megiddo to signify this victory, as the nearby ancient fortress of Tel Megid appears in the Bible as Armageddon, the location of the final battle between the forces of good and evil.

Victory Exploited


RAF Aircraft Over the Sea of Galilee Heading to Damascus (Sidney W. Carline, 1919)


Despite the defeat of the 7th and 8th Ottoman Armies, elements of the Ottoman 4th Army were deployed away from the destruction at Sharon and Nablus and still posed a risk. Learning of the losses at those battles, they retreated northward. Allied aircraft again caused heavy losses on the retreating troops.

The continued pursuit northward was aided by Lawrence and the Arabs, who, after capturing Dera, cut the lines of retreat of the Turkish 4th Army. Cavalry divisions from the DMC were thus able to sustain the chase while the Arabs secured the flanks. Air-ground cooperation continued during the pursuit Damascus, with RAF motorcars accompanying lead units of the DMC. Lorries carrying fuel and stores followed closely behind, allowing air assets to keep pace with the fast-moving cavalry.

As the last desperate elements of the 4th Army reached Ziza they found their path blocked by the ANZAC Mounted Division. Pursued by Arab irregulars embittered by years of occupation, they surrendered en masse to the Anzacs rather than face slaughter at Arab hands. In the entire battle, the Allies had inflicted losses on the Ottomans of over 25,000 killed, wounded, or captured, effectively ending their ability to continue the war.

To the west at the south end of the Sea of Galilee, just before dawn on 25 September, mounted troops approached the rail junction of Samarkh. (See illustration at top of the page.) The advance units received heavy fire. Reforming, the 11th Light Horse Regiment attacked the eastern end of the town and two squadrons of the 12th Light Horse attacked the western end. Samarkh was secured by 0500 with 365 prisoners taken—half of them German. Once the 4th Australian Light Horse Brigade occupied Samakh, the last Turkish stronghold and communications center west of the Jordan was eliminated. For Allenby's forces the way to Damascus, Beirut, and Aleppo now lay open. The remaining Turks were now in headlong retreat, and Chauvel's telegraphic orders on 26 September disclosed that Allenby had revised his battle plans beyond the enemy's annihilation. "Seventh and Eighth Turkish Armies have been destroyed. Fourth Army is retreating on Damascus via Dera. Desert Mounted Corps will move on Damascus."

Ottoman stragglers who had escaped the destruction at Megiddo continued to filter north in the hope of regrouping. What followed was one of the most remarkable military pursuits in history. Chauvel led the DMC northward, covering over 100 miles (160 km) in three days and crossing the Golan Heights.


Desert Mounted Corps Crossing the Golan Heights


One subaltern with the 18th Lancers noted the swath of destruction created by the far-reaching cavalry and aircraft. "We had covered 80 miles in 34 hours. What a sight the roads were! Abandoned lorries and cars, cut off in their attempt to escape, stood every few yards on the road. . . El Affula was a shambles. Engines and trains full of army winter clothing and kits stood in the stations, just as they were surprised that morning."

On the morning of 1 October, the most advanced unit, the 3rd Australian Light Horse Brigade, entered Damascus in pursuit of fleeing Ottoman troops. They accepted the city's formal surrender, much to the annoyance of Lieutenant-Colonel T.E. Lawrence, who had planned a grand ceremony in support of the Arab insurgents' claim to self-rule.

With Damascus occupied in force, Allenby was yet again able to set his sights northward—this time to Aleppo, 200 miles north of Damascus. Meanwhile, the 3rd Indian Division headed to Beirut and the 7th Indian Division towards Baalbek. Homs was also captured, on 16 October.

As an illustration of the depth of the EEF's striking power, the 5th Cavalry Division had marched approximately 550 miles in just under 40 days. Though the final pursuit depleted the strength of the cavalry's men and horses, by the end of October the final shots of the war in the Middle East were fired at Haritan, just outside the limits of Aleppo. Five days later the Turks signed an armistice and the 600-year-old Ottoman Empire was subsequently partitioned.


Indian Lancers Entering Damascus


From the opening of the Megiddo battle to the armistice, the EEF captured 75,000 prisoners, 360 artillery pieces, and 800 machine guns. For its efforts, the EEF suffered 5,666 casualties, though of those only 853 were killed in action. As Matthew Hughes contended, the "completeness of the victory at the battle of Megiddo surprised [even] Allenby." In a letter to his wife, Allenby wrote that he was "almost aghast at the extent of the victory." Indeed, it had been one of the most decisive battles fought in World War I, causing the ruination of three Turkish armies and the capitulation of an empire.

Sources: Our articles on Allenby's 1918 campaign have quoted extensively from two studies, "Deep Battle in World War One: The British 1918 Offensive in Palestine," by Lt. Cmdr. Paul A. Povlock of the Naval War College, and "Armageddon’s Lost Lessons: Combined Arms Operations in Allenby’s Palestine Campaign," by Lt. Col. Gregory Daddis of the U.S. Military Academy. Maps from the West Point Atlas and the British Army Museum.


Friday, January 5, 2024

The Battle of Armageddon, Part I


Key Locations in the Late 1918 Palestine Campaign


On my trip to Israel in 1989, one of our group's days of touring was dedicated to the northern part of the country. It turned out to be a long haul that included stops at Nazareth, the Mount of the Beatitudes, a kibbutz, the Sea of Galilee, and more. On the stretch back to Jerusalem, our guide let us rest a bit, and everyone was dozing off. Abruptly, the bus stopped, and our guide went on the mic to announce in a dramatic tone, "Look around ladies and gentlemen. You are in the Valley of Armageddon. According to some scriptures, this is where the last battle between Good and Evil on Earth will be fought." That sure woke everyone up—possibly like me—hopeful that the big battle was not about to start, like, now. Anyway, over the next two days, I'll be presenting the story of the Great War's Battle of Armageddon, know in formal military histories as the Battle of Megiddo.

After Jerusalem: What Next?

Allenby's 1917 campaign had achieved significant operational and strategic objectives. He had broken through the Gaza defenses and into the southern frontiers of Palestine, giving little respite to the retreating and shaken Turks. His capture of Jerusalem gave the Allies a much-needed morale boost in an otherwise sagging war effort. With 1917 coming to a close, Allenby would continue to focus on the complete annihilation of the Turkish forces in Palestine. Winter rains had put an end to campaigning for the Egyptian Expeditionary Force (EEF) after the advance from the Gaza-Beersheba line to the capture of Jerusalem in December 1917. This lull in the fighting offered the opportunity for the captured territories to be consolidated. Extensive developments were also required along the lines of communication to ensure that frontline troops were adequately supplied, as they were approximately 150 miles (240 km) from their main bases at Moascar and Kantara on the Suez Canal.


Muslim Soldiers of the British Army Guarding the
Dome of the Rock


After the shoring up, Allenby defined his first goal of 1918 on 25 January: "I want to extend my right, to include Jericho and the N[orth] of the Dead Sea." This advance would remove the more serious threat to his right by pushing all the enemy across the Jordan River and securing the Jordan River crossings. It would also prevent raids into the country to the west of the Dead Sea and provide a narrow starting point for operations against the Hedjaz Railway.

Allenby's Allied troops began the renewed offensive on Tuesday, 19 February, on the outskirts of Jerusalem. Despite battling adverse weather conditions and a determined enemy in the Turks, the Allies were able to move nearly 20 miles toward Jericho in just three days. On the morning of 21 February 1918, combined Allied forces of British troops and Australian mounted cavalry captured the city of Jericho. The time for a decisive push north through Palestine to Syria seemed at hand. However, distant events interceded.

Events on the Western Front would critically impact the organizational structure of the Egyptian Expeditionary Force in the early months of 1918. Hoping to break the deadlock of the trenches before American manpower would again shift the balance of power in favor of the Allies, Gen Erich von Ludendorff launched Operation Michael on 21 March. A massive drive of over 60 divisions, Michael made initial progress but was held up at Arras, thanks to a determined British defense, but the Allied High Command was alarmed.


Turkish Soldiers Killed Attempting to Retake Jerusalem


As Ludendorff continued to follow up his initial drive, the British War Office hurriedly pulled divisions from other theaters to fill losses in France. Allenby was forced to send the bulk of his soldiers to the Western Front, retaining only one British division. Partially trained Indian regiments constituted the majority of the EEF's replacements, and while the cavalry arm was no worse for the wear, the infantry and specialty troops were seriously weakened. For instance, signalmen, normally requiring two years of training, were forced to become proficient in just two months.

Before losing his veteran troops, the EEF commander ordered expeditions across the Jordan River toward Amman in March. Hoping to combine efforts with Lawrence's Arabs and capture important Turkish garrisons in the Es Salt region, Allenby believed the raids would demonstrate Ottoman vulnerabilities in the East. Unfortunately, poor weather grounded aircraft, Arab cooperation never materialized, and the Turks intrepidly fought off the attack. The EEF suffered its first setbacks in nearly a year. Chetwode later wrote, "These two expeditions of Allenby's across the Jordan were the stupidest things he ever did, I always thought, and very risky." While tactically a reverse, Allenby had accomplished one key operational objective. The Trans-Jordan raids had raised doubt in the enemy camp as to where the next major blow would fall—either east of the Jordan River or west, on the coastal flank.

Throughout the spring and summer of 1918, Allenby took advantage of the forced operational pause to bring his new troops up to training standards. One soldier in the Egyptian Camel Transport Corps described Allenby's guidelines: "The principle adopted in the infantry was to brigade one British battalion to every three Indian battalions right through the divisions; and this acted very well indeed, for the White troops provided just that leaven of steadiness lacking in the young Indians." During the same time, supply matters were tended to as the EEF's railway was extended to the front lines. Royal Air Force (RAF) pilots—the RAF being officially formed on 1 April 1918—flew photography missions while also dropping propaganda leaflets among the already demoralized Turkish troops. As desertion rates swelled among the ranks, Mustafa Kemal, commander of the Seventh Army, lamented that British aircraft were "dropping more leaflets than bombs."


Turkish Prisoners Captured, July 1918


By the autumn of 1918, Allenby decided that the time was ripe to capitalize on the deterioration of the enemy army. His plan, code-named Armageddon, aimed at the complete destruction of the Yildirim Army Group by exploiting Turkish preconceptions created in part by the Trans-Jordan raids. The Amman expeditions, coupled with the assault at Beersheba a year earlier, had shown the vulnerability of the eastern flank. Using an elaborate deception plan that reinforced Turkish predilections, Allenby decided to reverse the formula used at the Third Battle of Gaza by placing the weight of his effort on the coastal flank.

Organizing Armageddon

In September 1918 the British front extended from the Mediterranean Sea just South of Caesaria across the Judean hills to the Jordan River Valley slightly north of Jericho. The Jordan valley was steep and desolate with few serviceable roads. The Judean hillside was equally poorly suited for mobile operations. The major towns in this area had easily defended approaches. Only the narrow coastal region offered the terrain necessary for a rapid breakout. It offered few obstacles to movement, though the narrowness of the region could allow the Turks to concentrate there. The open terrain widened to the north with few obstacles to maneuver to the major Turkish command and communications centers at El Affula, Nazareth, and Samakh on the south end of the Sea of Galilee.

The EEF consisted of three corps comprising approximately 11 division equivalents of troops. Its XXI Corps contained four infantry divisions, including the two Indian divisions that had just arrived in theater, and a small French contingent. The XX Corps possessed two Infantry divisions. The British Desert Mounted Corps (DMC) was the mobile striking force. It consisted of the Australian Mounted Division and the Indian Cavalry divisions that had arrived from France.

Each of the Cavalry divisions contained armored car detachments, while the Australians were trained to fight as either mounted infantry or shock cavalry troops. Chaytor's Force, named after its commanding general, filled out the British ranks. This force consisted of the ANZAC Mounted Division and an Indian Infantry Brigade, plus supporting artillery units. At the sharp end of the stick, Allenby had 12,000 cavalrymen, 57,000 riflemen, and 540 guns, plus the normal combat support troops.


New Zealand General Edward Chaytor and Australian General Harry Chauvel Would Be Key Commanders in the Offensive

Supporting the main force were the Arab forces operating on the flanks and fringes of the EEF in Palestine. Numbering only a few thousand on a good day, possessing meager training and few heavy weapons and with a distinct abhorrence for suffering casualties, they proved to be a positive force multiplier in Allenby's scheme of operations. The Arabs continuously forced the Turks to devote much of their slender resources to keep the railroads open.

The forces opposing Allenby were organized under the Yildirim Army Group commanded by Liman von Sanders. South of the Haifa-Dera railway, this included three armies with 23,000 infantry and 2,000 cavalry. North of the line, in reserve, were 32,000 infantry and 3,000 cavalry.


Part II of The Battle of Armageddon will be presented tomorrow on Roads to the Great War

Sources: Our articles on Allenby's 1918 campaign have quoted extensively from two studies, "Deep Battle in World War One: The British 1918 Offensive in Palestine," by Lt. Cmdr. Paul A. Povlock of the Naval War College and "Armageddon’s Lost Lessons: Combined Arms Operations in Allenby’s Palestine Campaign," by Lt. Col. Gregory Daddis of the U.S. Military Academy. Maps from the West Point Atlas and the British Army Museum.


Thursday, January 4, 2024

Marine-Korps Flandern


By Phie de Schaepdrijver, Brussels Museum, and the Editors

The  Marine-Korps Flandern was the operational component for Germany's Marinegebiet (Marine Area) of the Flanders coastal area during the Great War. One of the elements of international tension in the run up to the First World War was the naval race between Great Britain and the German Empire. By the summer of 1914 the German fleet, which had been insignificant at the time of Bismarck, had grown into a formidable power—which did not actually play a role in the outbreak of war. While the German land armies advanced to the west and east, the navy's High Seas Fleet lay at anchor, so the British fleet was able to patrol the North Sea and make the first preparations for a blockade pretty much unhindered.


U-boats UB-2 & UB-6 Based in Zeebrugge


A few weeks after the conflict had begun, the German admiralty nonetheless demanded a role for the fleet. No head-on encounters between the warships on the high seas (the so-called Grosskrieg), but a lateral war of attrition against the vulnerable British trade and military shipping routes in the Channel–the so-called Kleinkrieg, to be fought out with lighter torpedo boats, minelayers, and submarines.  On 23 August 1914, Brussels was occupied, the Belgian and Allied armies retreated ever farther, Admiral von Tirpitz made a phone call to the German High Command demanding that marine troops be brought into action on the coast of the conquered districts in the west; as far as he was concerned the French were as good as defeated and the time had come for the war at sea against Great Britain.


Admiral von Schröder with Army and Navy Subordinates


So what would later become known as the Marinekorps Flandern came into being. Initially, a single naval division of around 17,000 reserves and regular troops were withdrawn from the ports of Kiel and Wilhelmshaven. On 24 August 1914, von Tirpitz dragged an old friend of his out of retirement—the 60-year-old Admiral Ludwig von Schröder (1854–1933), knowledgeable about planning a Kleinkrieg against Great Britain, took command of the German naval troops which had been sent west. In November and December 1914 they were strengthened by a 20,000-man second division.


Bicycle Patrols Were Used to Control the Local Population


Which ports were to serve as base of operations for this Kleinkrieg? In October 1914 German naval staff were still in favor of the well-developed and easily defensible French ports of Le Havre and Cherbourg. However, given the rapidly changing positional warfare, which even put Dunkirk and Calais beyond German reach, they proved to be much too far away. Out of sheer necessity they went for the Ostend-Zeebrugge-Bruges “triangle,” even though two of the ports were shallow and difficult to defend and neither Zeebrugge nor Bruges had adequate facilities for ship repairs. Zeebrugge did indeed have a long jetty, and it was linked to Bruges via fairly deep canals, which provided enough room for torpedo boats, submarines, and even light cruisers. On 14 October—the day that Bruges was taken by reserves of the German Fourth Army—von Schröder informed von Tirpitz that he wanted to use the city as his headquarters.


Machine Gun Emplacements Guarding the Beaches


This German Marinegebiet, including three ports in Ostend, Zeebrugge, and Bruges—bases for U-boats, torpedo boats, and destroyers—and the coast to Zeeland were quickly subjected to a particularly severe occupation regime . . .  In a very short period of time the coastal region was to be developed into both a weapon of attrition warfare and an unassailable bulwark, and the local population had to work together on it, whether they wanted to or not. The coastline was to become one immense defensive wall of artillery bases and bunkers, anti-aircraft guns and airfields. From 1915 von Schröder succeeded in creating a submarine, torpedo, and destroyer fleet in Flanders. By the end of the war a quarter of all sunken British vessels could be attributed to the U-Boot Flottille Flandern. . .


Coastal Artillery Mortar at Ostend


An aggressive commander, Schröder built up his area of operations from a division to a two-division corps with coastal artillery and air and naval assets. He battled bureaucratically  to ensure that his command did not become subordinated to the army, which of course carried the burden on the Western Front. On the other hand, the Naval Staff never wavered from its view that the primary theater of operations for Germany lay in the German Bight, followed by the Baltic Sea. The North Sea and Baltic station commanders accordingly resented, opposed, and hindered the transfer of their assets to Belgium. Realistically, the geography of Flanders severely limited meaningful German operations. While the three ports were interlocked via a canal system, all were small facilities without room for much expansion. Capital ships were too large to enter. Port constraints limited the number of surface craft. Even the submarines that formed the Flanders flotilla were small coastal models with limited range and ordnance. All but one were actually shipped in pieces from Germany and assembled in Antwerp and moved to Bruges via canals. Worse, proximity to the front and coast left the docking facilities at Ostend and Zeebrugge highly susceptible to air and naval bombardment and perilously close to long-range artillery. Finally, the ports lay so close to England the Royal Navy could easily intercept any major reinforcement effort. Nevertheless, the command exercised an ongoing not-to-be-ignored threat to the line of communication between Britain and France.


King Albert and the Queen at the Liberation of Bruges,
19 October 1918


The Marinegebiet was held tenaciously for nearly the entire war. Admiral von Schröder organized a successful attack on the Dover Barrage in 1916 and developed plans to counter a seaborne invasion. His forces successfully  beat off the famous Zeebrugge-Ostend raids of April 1918 and had the damage corrected promptly. The three ports were held and remained operational until just three weeks before the Armistice. Admiral von Schröder was called east toward the end of the war by the Kaiser to suppress the Kiel Mutiny, but his orders were never formally issued. For his service in Flanders he was honored with the Pour le Mérite (20 October 1915) with Oak Leaves (23 December 1917).

Sources: Occupied Bruges and the Marinegebiet, 1914-1918 by Phie de Schaepdrijver; Museum Archives of Brussels

Wednesday, January 3, 2024

Alfred Thayer Mahan and the Outbreak of World War One


Admiral Mahan


The renowned naval historian and strategist Alfred Thayer Mahan was still alive and kicking when the war started. He would live until the 1st of December 1914. In a 2023 ARTICLE in the Naval War College Review, Professor Kevin D. McCraine of the college took a fresh look at Mahan's observations on the war as it was developing. In his 74th year he was still perceptive and intellectually vital. McCraine summarizes some of the admiral's astute observations:

One day before Britain officially declared war, Mahan was interviewed regarding what he believed to be the origins of the war and the spark that had ignited it. His statements addressed power relationships among European states and underlying motivations instead of focusing on the assassination of Archduke Franz Ferdinand. Mahan believed Austria-Hungary had expected that Serbia would refuse its ultimatum and concluded that Austria would issue such a demand only if Germany had consented; we now know this speculation to be correct, in the form of the infamous “blank check.” Mahan also theorized about the underlying factors behind the Austrian and German decisions for war. He linked Austria’s choice to unease about the Slavic peoples along its southern border, while he connected the German support of Austria to concerns over the rising power of Russia. Turning to Britain, Mahan expected intervention. The date of the interview is important in this assessment. Twenty-four hours later, Germany’s violation of Belgian neutrality would cloud assessments of Britain’s decision, but on 3 August Mahan zeroed in on the balance of power and the effects on Britain’s position as a world power if its leaders did not intervene.

During the first days of the war, Mahan speculated a great deal about navies. This should not be surprising, given the overall focus of his writings and his association with the concept of sea power. Four years before the outbreak of war, one of his contemporaries even claimed, “We may regard him as the virtual inventor of the term. . . . He has made it impossible for anyone to treat of sea-power without frequent reference to his writings and conclusions.”  His writings on sea power focused heavily on the role of navies in both peace and war and how geography influenced the environment in which naval forces operated. 

Mahan identified the North Sea as “beyond any possible doubt the chief theatre of this great naval war.”  At the outbreak of the war, that body of water contained the largest concentration of warships of any region of the world. A casual  understanding of Mahan’s theory might lead us to expect a fixation on an imminent battle between the opposing fleets in that region, pitting the British Grand Fleet and the German High Seas Fleet against each other for control of the North Sea. Some evidence even points in this direction, for Mahan, at the outset of the war, speculated, “[W]e may expect any minute, apparently, to get word of a great engagement. . . 

He believed that the sea provided Germany a possible means of escape from its resource constraints. Overseas trade supplied its industries and fed its people. “It is a question of existence for her,” claimed Mahan. “The stagnation of her carrying trade on the seas must threaten her very life, and the neutral shipping, already taxed to its limits, cannot bear the additional burdens of supplying Germany. .  .  Germany needed the resources of the globe, but these were forthcoming only if its navy could overcome Britain’s dominating geostrategic blocking position that stifled German overseas trade. The British Isles sat astride Germany’s two routes out of the North Sea to access the global maritime commons: one through the narrows of the English Channel, the other through the wider but more tempestuous passage between Scotland and Norway.


Battleships of the High Seas Fleet Underway


As Mahan saw the First World War begin to unfold, he concluded that the German fleet lacked the strength to obtain the political objectives that German leaders desired. “Germany, therefore, might wish to postpone action till a happy blow, or happy chance, diminish the inequality.” In the meantime, Mahan thought the Germans would avoid dividing their fleet: “It will not risk division, with the chance that in seeking to unite[,] one part may be overwhelmed by the whole British force.” Even concentrated, the German fleet stood little chance against the entire Grand Fleet.

Sadly, though, Professor McCranie reports that Mahan's public commentary ended early and abruptly. President Woodrow Wilson quickly issued the following instructions to both the Secretary of War and the Secretary of the Navy: “I write to suggest that you request and advise all officers of the service, whether active or retired, to refrain from public comment of any kind upon the military or political situation on the other side of the water.” Although he appealed for reconsideration, Mahan would not disobey the order. A life in the naval service had created too strong a loyalty for him to trespass against a presidential directive. Mahan’s son later explained that his father stopped his current writing project almost midsentence: “He obeyed the order so far that he would not even set pen to paper to write.”  

[Subsequently] President Wilson’s order forced Mahan to restrict his musings about the war to private letters to friends. In these, he kept coming back to [an]  overall argument. [that] Germany’s greatest chance for victory entailed gaining a quick triumph on land by employing its well-trained army. A failure by the kaiser to obtain a rapid victory there would allow the Entente to succeed through endurance, largely because sea power would allow Britain to harness the globe’s resources while Germany found itself contained to a small geographic region of continental Europe.

By the time Mahan died in December it was clear to him that the war would be a long one. One family member recounted, “[T]here is no doubt. . . that his death was hastened by the worry caused through not being able to show our people, as this wretched war goes on, the necessity for preparedness, by illustrating the subject from the events of the day.”

Source: "Mahan’s Theory and the Realities of the First World War—His Final Considerations on Sea Power," Naval War College Review: Vol. 76: No. 1. 

Tuesday, January 2, 2024

The Ottoman Road to War in 1914


By Mustafa Aksakal
Cambridge University Press, 2008
Reviewed by Thomas E. Ward, II, PhD


This Title Can Be Ordered HERE


This book has the look and feel of a dissertation that converted for publication as a book—illumination of relatively obscure sources, a scholarly approach to those sources, thoroughly documented references, and attention to detail. Just the same, it is surprisingly readable. 

The core question in Aksakal’s book addresses why the Ottoman Empire entered the conflict in World War I on the side of the Central Powers and the Central Powers allied themselves with the Ottomans. His primary effort is to place the Ottoman decision for war in context, examining both the internal and external political landscapes facing the Ottomans, in the process largely debunking the widely accepted perception that Ottoman leadership was either incompetent or mesmerized by German influence.

A fundamental question for those not already intimately familiar with the Great War is why the Turks chose to participate in the first place, and why they chose to align themselves with the Central Powers. The answer is European encroachment: geographic, military, political, and financial encroachment, primarily by Great Britain, France, and Italy.

Aksakal lays out quite clearly the view of the world from the Ottoman perspective. Aggressive, expansionist European powers bent on imperial goals surrounded the Ottoman Empire. The maps provided by the author make the situation abundantly clear—the European powers, especially the Triple Entente members, had been biting off chunks of the Ottoman Empire for years. If the trend continued, partition of the empire was the likely outcome.  


At the same time, the Russians clearly had designs on Armenia, the Bosporus Straits, the Dardanelles, and even Istanbul. The humiliation of the First and Second Balkan Wars, in which the Ottomans lost major European territory to Serbia, Bulgaria, and Romania—all former territories of the Empire as recently as 1878, made the squeeze even more acute. From the Ottoman perspective, it was time to stand firm or be partitioned into pieces of European empires.

The environment was equally complex internally. The author illuminates the internal friction of the Sublime Porte and the populist ground swell prompted largely by the tales of Muslim refugees pouring in from annexed former territories. This examination is both thorough and thoroughly documented but would have benefited immensely from some simple visual aids. The maps that show the losses of the Ottoman Empire in the second half of the 19th century and the beginning of the 20th century provide excellent aids to situational understanding, but they are the only such illustration in the entire book.

Similar graphic explanations or illustrations of the relationships between ministries of the Sublime Porte would have been helpful, as would diagrams showing both the official relationships between the key personalities (title, office, office hierarchy) and familial relationships if they existed—there were at least nine Pashas in this story. Photographs of the principals would also help readers who find visual enhancements key aids to understanding.

This is a worthwhile book, but it is not an “easy read.” It does an excellent job of illuminating a relatively dim corner of history. In doing so, the book not only shines light on the events leading up to World War I, it provides superb understanding of context in the Balkan region that assists comprehension of events there in the late 20th and early 21st centuries

This review originally appeared in the July-August 2009 issue of Military Review, published by Army University Press


Monday, January 1, 2024

Seasons Greeting from a Doughboy in France


To All Our Readers

From Private Charley Eggeling, 49th Machine Gun Battalion


Click on Images to Enlarge


Charley Eggeling

Source: Center for American War Letters, Chapman University