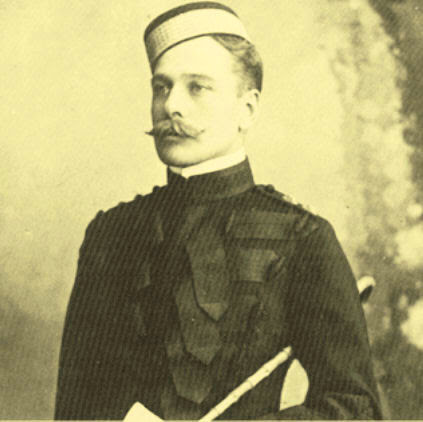
Now all roads lead to France and heavy is the tread
Of the living; but the dead returning lightly dance.
Edward Thomas, Roads

Wednesday, August 31, 2022

Wreck of WWI Destroyer USS Jacob Jones Located


USS Jacob Jones


More than 100 years after she went to the bottom in the Great War, the wreck of USS Jacob Jones, the first U.S destroyer to be sunk by enemy fire during World War I, has been located and filmed. Deployed to help fight the emerging dangers of the submarine, she would also be claimed by the menace of the new form of warfare. 

A team of British divers announced this week that they had identified the wreckage. It was discovered in about 400 feet of water (120 meters) about 60 nautical miles south of Newlyn in Cornwall, England. The Tucker-class destroyer was struck by a torpedo fired by German submarine U-53 on 6 December 1917. It sank within a span of eight minutes with only 46 of the 110 crew members surviving the attack. 

“We are thrilled to announce that we have identified the wreck of USS Jacob Jones, the first U.S destroyer to be sunk by enemy action,” said Steve Mortimer in a Facebook post. He was one of the six divers on the expedition. 

U-53 on an Earlier Visit to the United States


They were able to make a positive identification of the wreckage by locating the warship’s bell. In the water for more than 100 years, they turned it over and cleared some mud, and could clearly read the word "Jacob". They also saw other identifiable sections such as the base of a gun mount on the deck of the ship. The team did not remove anything from the wreck site and intends to liaise with U.S. authorities over the next steps.

Jacob Jones was a Tucker-class destroyer commissioned into the U.S Navy in 1916. Built as one of the six vessels, the ship was mainly involved in patrols, convoy escorts, and rescues, sailing from the U.S base in Ireland. Of all destroyers in European waters, she was credited with rescuing the greatest number of survivors, a total of 374, from torpedoed ships, before she met her own demise from a torpedo, 

Among the heroic rescue operations of Jacob Jones in the submarine-infested waters was picking up 44 survivors from the British steamship Valetta that had been the victim of a U-boat on 8 July, according to the Naval History and Heritage Command. Later that same month, the destroyer sighted a periscope while escorting the British steamship Dafila, but a torpedo hit the steamship before the destroyer could attack. She was able to rescue 25 survivors from the sinking Dafila. Later, she picked up 305 survivors from torpedoed British cruiser Orama while conducting special escort duty between Ireland and France.


The destroyer’s fate however would also be sealed by a torpedo fired from a U-53 German submarine. On the fateful day, Jacob Jones departed Brest, France, to return to Queenstown, Ireland. At 16:21 she sighted a torpedo wake at a thousand yards while steaming independently 25 miles southeast of Bishop Rock, Scilly Islands, and 20 miles east of Start Point, England. 

She maneuvered to escape, but the torpedo struck her starboard side causing extensive damage. With the stern sinking rapidly it was not possible to make safe the depth charges which were triggered, hastening the loss of the vessel, which sank below the waves only eight minutes after the torpedo struck. From the crew of 110, 64 men were lost during the sinking with the total likely to have been higher if the German U-boat commander had not radioed the position of sinking to the vessel’s base. Historians have termed this as a rare humane gesture in a time of war.

By the end of World War I in November 1918, it is believed Germany was responsible for sinking more than 5,000 merchant ships and around 100 warships.

This article and video are from the BBC. To read more about the sinking of the USS Jacob Jones, visit our earlier article HERE.

Tuesday, August 30, 2022

The Great War Illustrated 1915


By Jack Holroyd and William Langford
Pen & Sword Military. 2015, 2021
Bruce G. Sloan, Reviewer


The Great War Illustrated 1915 is the second in a series of five books covering each year of World War I. The more than 1,000 selected photographs are from the private archive of military collector and medals dealer Peter N. Taylor of Barnsley, in South Yorkshire, England. This is not just a collection of pictures, but 379 pages of corrected images, maps, and a brief explanation of their content. The photos shown here are from the book. Also included with each subject, action, or campaign is a very comprehensive explanation. The book is divided into seven chapters:

Chapter 1: Losses and Gains - Fighting at Sea, includes Naval and Marine action at Dogger Bank and Gallipoli, the Lusitania, and many other associated photos. 

Chapter 2: Middle East and the Gallipoli Failure, includes the Suez Canal, ANZAC participation, Turkish units, and the Gallipoli campaign itself. 

Chapter 3: The Battle of Neuve Chapelle, includes Indian troops, extensive order of battle, German photos and the aftermath.


Chapter 4: The Second Battle of Ypres – Hill 60 – Gas; trench warfare, destruction of Ypres, No Man’s Land, the use of poison gas and the efforts to minimize its effect. 

Chapter 5: Zeppelin Attack – Incentives to Join the Colours; background starts with LZ1 in 1900, then the bombing of Yarmouth and other sites in 1915, the different types of bombs used, British defenses, and the execution of Edith Cavell. 

Chapter 6: The New Army – The Armaments; recruiting, equipping, training, the manufacture of the tons of ammunition, barbed wire, etc. 

Chapter 7: The Battle of Loos; The first British use of gas, conferences of Allies, aerial photography and devastation.

Each photo is numbered in the Taylor Library Archive for use by editors and authors. As can be seen from chapter titles, the book covers the Gallipoli campaign and the western front for 1915. Do not expect to see the war in Africa or other theaters. There are many photos of British, Indian, and ANZAC troops and their adversaries; however, there are few photos of the rest of the Entente. This collection is notably a British collection.

Bruce G. Sloan

Monday, August 29, 2022

Recommended: Architecture, Memory, and the Old Western Front


Soldiers in the Ruins of Ypres, September 1917


By Tim Fox-Godden
Orignally presented in Oxford University's WWI Centenary Website

If we think about artistic responses to the First World War we are likely to conjure up images filled with vibrancy and movement: the works of Paul Nash, Percy Wyndham Lewis, and Christopher Nevinson amongst many others. These visceral landscapes, whilst being stalked by death, capture so much life, too. Likewise, if we consider the poetry and literature of the war, we are confronted with the cutting satire of Siegfried Sassoon and Wilfred Owen, by the gritty modernist visions of David Jones' trench and battle scenes and by the poignant, elegiac writings of Rupert Brooke. In both forms of response we regard them as multi-layered representations of the experience and memory of war.

Now let us consider architecture. If we think of any architectural response it is likely to be one of these: a village war memorial, the seemingly endless names on the larger, national memorials, or rows and rows of white grave markers. As a result of this, concepts of war experience, memory and death within the architectural response have become inextricably entwined. There is no life in them. The architectural response to the war has come to represent only death.

Of course, most soldiers weren't poets or artists. Indeed, the involvement of mass civilian armies meant that for much of the war most soldiers weren't even soldiers. Most soldiers certainly weren't architects, but, for many, the most common creative experience of the war was an architectural one ' one defined by designing, building and living in trenches, and done so in the wider architectural setting of ruined villages, billets and blockhouses.

Indeed, even the absence of architecture is noted in many a memoir. Strangely, despite these architectural memories serving as a framework for the veteran to hang the narrative of their own war experience upon,the architectural connection between war experience and the creative response to the war has not received the same academic attention as the poetic and artistic responses. It should not be forgotten that these "architectural memories" (Chapman, 1933) were also the experiences of the nearly nine out of ten soldiers who returned, not just those commemorated in the cemeteries and memorials. My research considers architecture as both a reflection on war experience and a response to the war. It explores the relationship between experience, memory, and the architectural designs of the Imperial War Graves Commission (IWGC). More specifically, it seeks to understand the layers of memory, beyond the primacy of a death-centric narrative, designed into the cemetery architecture.


Hedge Row Trench Cemetery, Ypres


One of the central themes of my research is the role of the architecture of the war cemeteries in retaining aspects of memory that are as pertinent to those who survived the war and to those of us who still visit the former Western Front, as they are to those buried in them. The broader role of memory designed into the cemetery architecture can be split into two groups. First, the direct relationship between the architectural treatment of the cemeteries—that constituting anything that forms part of the design, be it the entrances, perimeter walls, layout, etc.—with the retaining or preserving of an aspect of the wartime landscape. Secondly, those aspects of design that do not literally preserve an element of the battlefield but use motifs of the landscape and the broader experience within the design, such as the architecturally inferred shell hole designed into the cemetery at Hedge Row Trench Cemetery.

An important additional concept is that of space and place; a space being a non-specific area and a place being geographically (or in this case metaphysically) locatable. In terms of a soldier’s war experience, the passage of time turned the places of their memories into indistinct spaces with no relatable features. Their experiences became dislocated from the landscape—the home of these memories. Direct experience of these places and spaces was intrinsic to the design process enabled by the IWGC’s policy to only employ ex-soldiers as Junior Architects. This decision ensured that the architecture of the cemeteries retained not just the identity of place, but also reconnected individual memories of the Junior Architects and communal memories of the returning veteran with the post-war landscape.


New Munich Trench Cemetery, Somme


Until now it has been assumed that the cemeteries are arbitrary in both design and location. The received wisdom is that the men are buried where they fell and the designs were purely practical. This approach has led to the dislocation of the cemeteries from the broader experience and memory-scape of the landscape they sit within. By placing the architectural designs into the context of the First World War landscape of the old Western Front, forgotten aspects of the design process that contain multiple layers of experience and memory are revealed. These revelations urge us to reconsider the architecture of the IWGC as important a response to the war as that of art and poetry. With the passing of the war from living memory, my research highlights the need for the cemetery architecture of the now Commonwealth War Graves Commission to truly be considered a memorial, not just to the dead of the war, but to the lives and experience of all who served.

Sunday, August 28, 2022

Carpathian Winter Fiasco


K.u.K. Machine Gunners


By Graydon A. Tunstall

In mountain operations protection from the elements is often as important as protection from enemy fire. (Nato Manual)

The Carpathian winter war of 1915 presents one of the most significant—and, in terms of human sacrifice, most tragic—chapters of World War I. The mountain battles that pitted allied Austro-Hungarian and German armies against Russian troops were unprecedented in the age of total war. In the winter of 1915, the Dual Monarchy launched three separate and equally ill-conceived offensives: an initial effort on 23 January; a second uncoordinated assault on the Russians on 27 February; and a third and final effort to liberate Fortress Przemysl in late March. The Karpatenkrieg comprised three separate campaigns launched by the Habsburg Supreme Command from mid-January to April 1915. The Eastern Front operation, which ultimately engaged more than a million men on each side, could hardly have been conducted under worse conditions. The Carpathian Theater lacked the railways, roads, communication lines, and other important resources necessary for maneuvering mass armies. Moreover, the contenders soon found themselves ensnared in an inhospitable mountain environment in wintertime.

The Habsburg command had made no prewar contingency plans for a mountain campaign lasting into the winter months—one of its many failures—and this would prove to be a disastrous mistake. Infantry masses were deployed into the mountainous theater with no provision for winter uniforms or suitable equipment. Conrad's troops were sent to the mountains in winter without the most rudimentary winter provisions, including warm clothes, and saws with which to fell trees for firewood. Boots with cardboard soles, for example, quickly became unusable.

Thousands of Habsburg troops fell victim to "the white death,” living in the open in subfreezing temperatures with no shelter. Weary soldiers spent the long winter nights struggling to stay awake to avoid frostbite or freezing to death as nighttime temperatures dropped to as low as -25°F. Emotional fatigue set in amongst the living, compounded by the lack of food and sleep.

Nevertheless, Conrad's soldiers continued their attacks. Troops were expected to undertake exhausting marches through meter-deep snow to reach the battlefield, only to find no shelter awaiting them. In a cruel twist of fate, frigid conditions were interspersed with sudden periods of rising temperatures and thaw. Steady rain and melting snow turned the valley terrain into a pit of mud as troops, artillery, ammunition, animals, and supply wagons sank into the mire. Rising floodwaters swept away bridges, and soldiers were forced to lie in the waterlogged positions.

The troops had to dig out in order to go on patrol, launch an assault, or clear defensive positions and the limited roads and trails essential for the movement of supplies. The shoveling required hours, sometimes days, and the burden of these tasks contributed to the physical and moral decline of Habsburg forces. Utterly exhausted, many of the troops became apathetic or committed suicide by shooting themselves or exposing themselves to enemy fire. Tens of thousands of horses, too—critical to the Habsburg supply chain—succumbed to overexertion and starvation.


Russian Artillery in the Carpathians

Habsburg Third Army suffered immense losses during the first Carpathian offensive. Two weeks after it began, official sources listed 88,900 men as casualties. Their total losses during the offensive exceeded 75 percent, most of them resulting from severe frostbite, exposure, or illness. The Third Army commander, Svetozar Borojević, rightfully claimed that his army had not been prepared for the demands of a mountain winter campaign.

On 1 March, during the second offensive Colonel Georg Veith of Third Army wrote: "Fog and heavy snowfalls, we have lost all sense of direction; entire regiments are getting lost, resulting in catastrophic losses." Habsburg archduke Joseph August, commander of VII Corps, reported that over two days his Hungarian Honvéd Division "suffered terrible losses; its effective force numbers less than 2,000. . .and tomorrow, despite the casualties, we have to attack again. My corps losses since 1 March: 12 officers, 1,121 men killed, 46 officers and 2,121 men wounded, 2 officers and 685 men missing. This is really terrible."

With the failed third Carpathian push grinding to a halt, the army's offensive efforts ended on 23 March. When Conrad ordered the South Army commander to transfer "dispensable" units to the embattled Third Army, he declined, stating that he required them for future operations. Conrad grew despondent, with his adjutant describing the situation as hopeless. An entry in the V Corps logbook observed, "It is as though Heaven is against us. When we attack, it starts snowing and more than one meter deep. When the Russians attack, the snow freezes and movement is possible."


Austrian Troops Retreating

For the Dual Monarchy, never to be forgotten was the series of operations that opened in 1915 in the Carpathian Mountains. Conrad's flawed planning and failures in the campaign also resulted in the German military exerting greater control over the Habsburg command structure. One of the most ill-conceived campaigns of the war, the Carpathian winter war offers far too many examples of how not to conduct winter mountain battle and provides a stark lesson about the negative effects of inadequate leadership.

Religious souls visualize hell as a blazing inferno with burning embers and intense heat. The soldiers fighting in the Carpathian Mountains during that first winter of the war know otherwise.
(Colonel Georg Veith, Third Army, k.u.k)

Source:  Over the Top, February 2015

Saturday, August 27, 2022

Luxembourg's Once-Lost World War I Memorial


Gëlle Fra (Eng: Golden Lady) is the common name of the Monument du Souvenir, a 21-meter-tall obelisk memorial with a sculpture atop located on the Place de la Constitution in Luxembourg City. It was created in 1923 by the sculptor Claus Cito to commemorate the Luxembourgers who voluntarily served in the French and Belgian armies and died in the First World War. It represents peace, victory, and the nation remembering its war heroes. Germany occupied Luxembourg during the First World War, so there was little that the nation's people could do to help the Allied Powers. But over 3,700 Luxembourgers living outside of the country volunteered to fight in the French Army; over 2,000 of them became casualties of the war. The monument was created to honor their courage and sacrifice.


Its main sculpture, a gilded bronze, is modeled on the ancient goddess Nike des Paionios, which today stands in the Archeological Museum of Olympia.  The bronze figures on the base, a supine dead man and a seated mourner, are shown in classical antique clothing rather than uniforms.

From 1923 to 21 October 1940, the Gëlle Fra symbolized the freedom and independence of the Luxembourg to its population. Once again, though, German forces occupied the country. From 19 to 21 October 1940, there were several attempts by the occupying administration to destroy the Gëlle Fra monument, which repeatedly failed due to the civil resistance of the Luxembourgers. Luxembourg construction companies and their workers refused the demolition, protest meetings of mostly young Luxembourgers were violently dispersed, and a three meter high wooden fence around the Gëlle Fra area was built. 


On the afternoon of 21 October 1940, the Gëlle Fra was torn down by German engineers using a steamroller and steel cables. The bronze figures on the base had been saved earlier by a Luxembourg construction company, but the main golden figure broke into three parts. It was saved and hidden by unknown Luxembourgers. Gëlle Fra remained missing for almost four decades until she was found in January 1980 under the stands of the Josy Barthel municipal football stadium. 


After extensive restoration work, it was rededicated on 23 June 1985 in the presence of Grand Duke Jean and the government. Today the memorial commemorates those who died in World War I and World War II, as well as Luxembourgers who died in the Korean War. The Gëlle Fra is Luxembourg's national symbol of freedom and resistance of the Luxembourg people. In 2010, the Gëlle Fra traveled, well packed in a wooden box, by plane to the Shanghai World Exhibition, where it stood in the Luxembourg Pavilion for six months. To be on the safe side, an exact cast had been made beforehand and the figure itself newly gilded. 

Sources: GPSMyCity; Wikipedia; WikiCommons

Friday, August 26, 2022

War Admirals:— A Roads Collection


Naval Officers of World War I
by Sir Arthur Stockdale Cope
National Portrait Gallery
(8.7 ft x 16.9 ft)


From the Editor:  This is a representative listing, not inclusive of all the articles we have published on this top in Roads to the Great War. MH

Articles


Reinhard Scheer Commanded the High Seas
Fleet at Jutland


Admiral David Beatty (RN), Admiral Hugh Rodman (USN), King George V (RN Officer), the Prince of Wales, Admiral William Sims (USN)


Book Reviews

The Kaiser, Admiral Tirpitz, and General Moltke


A Reminder: To search our archives for other articles on this topic, or to explore other World War One interests of yours, take advantage of the site search engine at the top left corner of every page on Roads to the Great War.

Thursday, August 25, 2022

Remembering a Veteran: Private Nels Wold, 138th Infantry, 35th Division (KIA)


Nels Wold Before the War


Nels Wold was born in Winger, Minnesota, in 1895 to parents who had emigrated from Norway. He was one of ten siblings. As a teen, Wold worked a few jobs before joining the Army in April 1918. Shortly after that, his unit—Company I, 138th Infantry, 35th Division—shipped out to Europe.

Much of that summer was spent training, but by autumn the 22-year-old Wold found himself in the trenches during the Meuse-Argonne Offensive, a major part of the final Allied offensive of the war.

On the foggy morning of 26 September 1918, his unit and thousands of other Allied troops near Cheppy, France, made up the spearpoint of a massive drive to finally push the German Army out of France.

According to the 35th Division’s history, Wold’s company had been held up by several German machine gun nests, so he volunteered to sneak up on one of them. It was a success—he managed to silence the guns, kill some enemies, and bring back some Allied prisoners—so he sneaked up on three more nests. After silencing all four, he had brought back 11 prisoners.

Later that day, Wold jumped from a trench and rescued a fellow soldier who was about to be shot, taking down the would-be enemy shooter in the process.

His success was short-lived, unfortunately. Wold tried to sneak up on a fifth machine gun nest, but the Germans saw him coming and fired. He went down.


At Winger, Minnesota


When Wold’s company realized he wasn’t coming back, they rushed the nest as a group and took out the enemy inside, dragging the injured Wold nearly a mile to safety, where he died telling his comrades to tell his family he loved them.

Wold didn’t survive, but his company was able to advance thanks to his courage. For that, he earned the Medal of Honor, which was given to his siblings by famed Gen. Leonard Wood during a ceremony in his hometown on 31 December 1919.

Wold was originally buried in France, but three years to the day after his death, his remains were returned and buried next to his parents in a cemetery near his hometown.

Source: "Medal of Honor Monday," Department of Defense, 28 January 2019


Wednesday, August 24, 2022

Recommended: The 1903 Springfield Rifle's Storied Military History


U.S. Marines in the Caribbean with Springfields 


Originally presented at Warfare History Network
By Christopher Miskimon

American infantrymen carried the model 1903 Springfield rifle into battle with them for the first seven decades of the 20th century

On 17 November 1915, Major Smedley Butler and a small force of U.S. Marines approached the old French bastion of Fort Riviere in Haiti. A group of rebels known as Cacos had taken refuge there, and Butler was sent to weed them out. Part of the 100-man Marine contingent crept close to the rundown fort and surrounded it to prevent the enemy’s escape, while another group made ready to attack the fort itself. After the Americans had moved into place, Butler blew a whistle to begin the attack. The Cacos were taken by surprise. Butler and a small force rushed the fort’s wall and found a small tunnel that led inside. Two Marines, Sergeant Ross Iams and Private Sam Gross, bayonets affixed to their Model 1903 Springfield rifles, joined Butler in leading the way into Fort Riviere. Once inside the fort’s crumbling walls, they quickly found themselves under desperate attack by the Cacos, who were armed with machetes and clubs.

Iams and Gross fought off the Cacos with their Springfields and continued to use their rifles to good effect even after the fighting evolved into a wild melee of hand-to-hand combat. Together, the three Marines opened the way for the capture of the fort and the destruction of the Caco force. For their bravery, the three would be awarded the Medal of Honor. For Butler, it would be his second Medal of Honor.


WWI: First Division Soldiers Equipped with Springfields


The Model 1903 Springfield rifle the Marines carried that day began its life as the United States took its first steps onto the world stage at the beginning of the 20th century. The United States had just completed a war with Spain, a victory that handed the Americans a set of overseas possessions including Cuba, Puerto Rico, and the Philippines. The rifle American soldiers carried in that conflict was the Krag-Jorgenson, the first bolt-action repeating rifle to become general issue to the army. The Krag had done its job, but it also had shortcomings. Its cartridge, the .30-40, lacked power and range compared to that of the German-designed Mauser rifles used by the Spanish. Krags also had to be loaded one cartridge at a time, while Mausers could be quickly loaded with five rounds connected by a stripper clip, giving Mauser shooters a higher overall rate of fire. The German rifle was fast becoming the world standard; in the event of another war, the United States could easily find its soldiers outgunned.

Research began quickly, and by 1900 the first prototype for the Krag’s replacement was being tested at the Springfield Armory in Massachusetts, then the country’s primary facility for the research and production of small arms. Several revisions ensued as part of the testing process, but by 1902 examples were being field-tested at Forts Riley and Leavenworth, Kansas. Reviews were  overwhelmingly favorable, and on 19 June 1903, the weapon was officially adopted as “United States Magazine Rifle, Model of 1903, Caliber .30.” Whatever the formal nomenclature, it would forever be known as the 03 Springfield. The Armory ceased production of the Krag and began cranking out the new rifle at the initial rate of 225 per day, with more than 30,000 produced the first year alone.

Continue reading the article HERE

Tuesday, August 23, 2022

The Western Front: A History of the Great War, 1914-1918


By Nick Lloyd
W.W. Norton & Company, 2021
David F. Beer, Reviewer


As soon as I saw inside this book’s back cover that the author is “one of Britain’s new generation of military historians,” I decided to read it. I was also impressed that Lloyd had already authored four books and that The Western Front is the first of “a three-volume history of the First World War. Subsequent volumes will concentrate on the Eastern Front (including Italy and the Balkans) and the wider war (the struggle in Africa and the Middle East)” (xx).

Having read quite a few standard histories of the war, I was curious about how a "new generation" historian might handle the material. What struck me most is that the book is very much an inclusive study. Lloyd has gone to great pains to not emphasize one army over another but to include all the main protagonists neutrally and equally: Germany, Britain, France, and the United States. As a result, I was pleased to find much more information on the contributions of the French and American armies than one usually finds in histories by British authors.

This doesn’t mean that Britain and Germany aren’t given their full due in this 657-page volume. As the author points out, the book is an interwoven narrative dependent on a considerable range of sources and viewpoints, including official histories and collected documents published after the war. Worth noting is the following:

Although the United States never published an official history, a seventeen-volume collection of selected documents of the history of the American Expeditionary Force (United States Army in the World War, 1917-1919) ensured that the enormous contribution that the doughboys made towards ending the war has not been forgotten (xxiii).

Lloyd’s approach to the senior commanders of the combatant armies is also notable and to many would be refreshing. He admits that this history “has been written primarily through the lens of those senior commanders who fought the war at what modern militaries refer to as the operational level.” He has little truck with some traditional views that the war’s leaders were "butchers" or donkeys.


Direct quotes in the text often give a sense of immediacy and loss. For example, a German officer unsuccessfully attempting to move his men forward at Verdun under “horrific machine-gun fire” writes:

We sought refuge in a shell-hole, but it was full of water. We lay flat on the ground behind the piles of earth created by the shells. No one dared stir or lift their head. The machine-gun fire was constant. A grenade exploded in front of us; a splinter shattered the thigh of the man to my left…We pressed even closer to the ground. It was impossible to bandage the wounded. We lay for five hours on the hard, cold ground in the face of this relentless fire. In the evening, one survivor and I managed to rejoin the battalion (p.185).

Later in the war, with Operation Blucher under way, both sides had considerable reservations and doubts. The use of American troops was hotly debated, as is well known. Disagreements within the French was rife as all were under stress. When General Fayolle was ordered to draw up plans to attack in the Amiens-Montdidier sector, his response was

There is always disagreement between Pétain and Foch…The latter would like to attack, the former would not. Pétain exaggerates the power of the Boche. Foch does not appreciate its true value. They are both right and wrong. If the two were combined, they would create a true and complete leader (p. 426).

This substantial book is divided into three Parts. Part 1 covers Liege to the Second Battle of Champagne; Part 2, Verdun to the Second Battle of the Aisne; and Part 3, Messines Ridge to Compiègne. Each Part consists of seven or so chapters, each titled by a relevant quotation. There are 41 excellent black and white photos, and the 14 maps are clear and usable enough. We also get a two-page glossary of military terms up front and a ten-page Cast of Characters at the back, followed by full reference notes, a bibliography, and an index.

I might not recommend The Western Front as a first read to someone who is just beginning to study the Great War. The information is detailed, and it helps to already know the rough outline of the war. Nevertheless, the prose is flawless, and the book is a pleasure to read. The front and the back material are helpful, especially the long "Cast of Characters." I very much look forward to the remaining two books of this trilogy.

David F. Beer

Monday, August 22, 2022

Norway: The Neutral Ally


Norwegian Troops Mobilized at Coastal Fort for
Neutrality Protection


Norway managed to stay neutral during the First World War, but the war still crept into Norwegian life and impacted it in numerous ways. With a large merchant fleet—the fourth largest in the world—and heavily dependent upon imports, Norway’s relations with the belligerent parties became problematic soon after the outbreak of war. Less than a year into the war, Norway had to negotiate trade agreements with Great Britain that strongly favored Britain and the Entente. In late 1916, Norway was forced to cease trading with Germany. This process culminated in April 1917, when Norway, through a “Tonnage Agreement,” in effect gave Britain full control over the Norwegian Merchant Fleet. Norway thus became a "Neutral Ally" of Great Britain.

The crisis in late July 1914 took the Scandinavian countries by surprise. In February, during a parliamentary debate, the Norwegian Prime Minister, Gunnar Knudsen (1848–1928), had described the European situation as “cloudless. When Germany declared war on Russia on 1 August, Norway, along with Sweden and Denmark, issued a declaration of neutrality. On 4 August the Norwegian government issued an additional, separate statement, again emphasizing its neutrality. Two days earlier, the Norwegian Navy had been mobilized and soldiers were sent to man the coastal fortresses. Norway was mobilized to protect its neutrality. 

Norway was ready to defend its neutrality, despite being both politically and militarily unprepared for war. The armed forces had not fired a shot since 1814, and the political authorities had no experience of international crises. The first priority of the government was to keep Norway out of the war; the second was to provide supplies in order to feed the population and maintain economic stability. The catastrophic effect of the British blockade during the Napoleonic Wars was still a part of the collective memory.  By the time of the war, Norway’s merchant fleet was the fourth largest in the world overall and, in terms of carrying capacity per person, actually the largest. Norway was importing to and exporting from both Britain and Germany and had no desire to stop either. Some of Norway’s major exports were fish and fish-related products (fish oils, etc.) and iron pyrites and copper, which were important commodities for the German war industry. Meanwhile, imports were dominated by fuels such as coal and oil. Significantly, though, despite their dependence on war materials from Norway, the German Navy showed no reluctance to sink the Norwegian ships sailing to Britain. In the course of the war, U-boats would send 889 Norwegian ships to the bottom. This, naturally, outraged  the Norwegian public, tilting public opinion further toward the Allies.


King Haakon VII of Norway (left), King Gustav V of
Sweden (center), and King Christian X of Denmark
(right) Meeting in Malmö, Sweden, December 1914


Like much of Norway’s history, what happened next comes down to ships  and global commerce. The fuels were vitally important for keeping both Norway’s industries and the merchant vessels running. And most of the fuels came from Britain. Once Britain successfully secured the North Sea as a military zone under their control, they had big levers to use to ensure Norwegian compliance.  On the other hand, given that Norwegian ships could get to Germany without using the North Sea, it was easy for Norway to bypass the Royal Navy checks via the Baltic that would have seized goods. The Norwegian foreign minister at the time, was able to deal with both parties concerns quite well. He was a businessman and fluent in German, which was an advantage in the situation. 

Nonetheless, even though Norway was a neutral country by international law able to trade with both sides, the trade became so heavily skewed toward Britain that Norway was, in some ways, starting to appear like an ally of Britain, posing as a neutral. By the end of 1916, the Norwegian government was under heavy diplomatic pressure from the Allies to cease trading with Germany.  Several agreements were made, none completely satisfying to the British government. On Christmas Eve 1916, the British government issued an ultimatum, informing the Norwegian foreign minister, Nils Claus Ihlen, that British exports of coal to Norway would cease unless trade with Germany stopped. The Norwegian government weighed their options and eventually submitted to the ultimatum. This coincided with Germany's expansion of unrestricted submarine warfare at the beginning of 1917. All Norwegian ships were now fair game for the U-boats, and losses at sea quickly skyrocketed to 66 sinkings in March 1917 and growing to 423 for the year.


Norwegian Freighter Rufus Sunk by a UB-37


The Tonnage Agreement

To replace their shipping losses, the British government made gestures toward several neutral countries regarding a possible purchase of their ships. The British initiative was discussed and rejected, but the problem of Norway's own losses remained unsolved: Was it possible to reduce their merchant navy’s huge losses?

The Norwegian government suggested an alternative. The Allies would charter Norwegian vessels and use them for safer routes outside of the War Zone. Allied ships, armed and eventually convoyed, would replace Norway's  ships on the most exposed routes where losses occurred. This was agreeable to all parties. Toward the end of April 1917, the Norwegian parliament accepted the transfer of ships by chartering or requisitioning. The deal between Norway and Britain was signed by representatives from the Norwegian Ship Owners Association (Rederforbundet) shortly thereafter and thus camouflaged the Norwegian government’s role:

As a return for and conditional on the concessions embodied in the agreement as regards the supply and transport of coal to Norway, the Rederforbund has declared itself willing to enter into this understanding, with a view to increase the Norwegian tonnage employed in allied trade, while at the same time safeguarding as far as humanly possible Norwegian seamen’s lives and Norwegian shipping property by the substitution of British ships for Norwegian in the Anglo-Norwegian trade.

Norway had become the "Neutral Ally." As it turned out, it was the introduction of convoys that reduced the losses from the peak in March. The entry of America into the war helped nudge Norway even closer to the Allies. Most significantly in strong-arming the Norwegians to  acquiesce in the laying of the huge (60,000-mine) North Sea Barrage, a large part of which was set in Norway's waters.

Norway was badly hurt by the war at sea, 1.3 million tons—about half of Norwegian merchant shipping—and 11,050 seamen being lost. With growing casualties caused by German submarine warfare, public feeling in Norway grew strongly anti-German during the second half of the war. The war also drained the Norwegian government financially. Financing the neutrality guard was costly, as thousands of men were mobilized for more than four years. It was not until two years after the war that the real situation—that Norway had accumulated a massive debt during the war—became known.  

But Norway's independence had been kept. Surviving the  complex "Neutrality Game" in the First World War convinced Norway's interwar leadership that it could similarly maneuver through any future international crisis. It was a perception that was to be proven wrong in 1940.

Sources: Encyclopedia 1914-1918; Life in Norway; Wikipedia

Sunday, August 21, 2022

From Subaltern to Major General: The Meteoric Rise of Douglas Haig


Young Douglas Haig


What skills and qualities did Douglas Haig (1861–1928) show in his young life and early military career that might have indicated his future suitability for supreme command? His biographer professor Andrew Wiest addressed that issue in his monograph Haig: The Evolution of a Commander and found his subject a most accomplished junior officer.

Douglas Haig was born in Edinburgh, Scotland, on 19 June 1861, the son of John and Rachel Haig. The youngest son of nine surviving children, Douglas Haig was little influenced by his father, who died in 1878.  Instead, his mother and his sister Henrietta were the prime forces of his young life. A rather indifferent student, Haig first attended school at Clifton and then went on to Brasenose College, Oxford. University life, though, failed to seize the imagination of young Haig, who paid scant attention to his studies.  Haig did, however, become increasingly engaged in the university social life of the era, taking on the trappings of a Victorian gentleman.

After a short and undistinguished stay at Oxford, in 1883 Haig took his sister Henrietta’s advice and embarked on a career in the military by entering the Royal Military College Sandhurst.  Though he was older than most of his classmates, Haig was quite determined to succeed in his chosen career path. When asked to join in on an evening gambling session Haig remarked, "It’s all very well for you fellows, you are going into the Army to play at soldiering, I am going in it as a profession and I am going to do well in it." Eschewing the social life that was so important to most young men of his social standing, Haig applied himself to his studies with great diligence.  Graduating first in the order of merit, Haig received a commission in the 7th Hussars in 1885. A fine rider and polo player, Haig would be forever associated with the cavalry, and before the Great War he would be one of the staunchest defenders of the cavalry’s utility in modern war. 


Junior Officer


After a brief stint with the 7th Hussars in India, Haig returned to Britain and worked further to codify cavalry technique. Very ambitious and very sure of his own abilities, Haig then entered Staff College, which represented the fast track to promotion. As he had at Sandhurst, Haig excelled, remaining wedded to his studies and aloof from most of his contemporaries. In his two years at Staff College Haig certainly impressed many of his instructors, causing one to comment that Haig "one of these days will be Commander-in-Chief." Haig’s tenure at Staff College was critical to the formulation of his understanding of the nature of modern war. He learned well that a major conflict would consist of four phases: maneuver, first clash of battle, a wearing-out fight of varying duration, and, finally, a decisive blow followed by exploitation.  Haig, along with the commanders of every combatant nation, certainly expected this model to hold true at the outset of the Great War. Haig also learned that wars would be mobile and that superior morale, not superior firepower, would bring victory to forces that were rather evenly matched. 

After Staff College, Haig saw brief action in the Sudan before moving on to more significant service in the Boer War. In the difficult struggle that would point out so many of Britain’s military failings, General John French served as commander of the British Cavalry Division in South Africa and Haig served as his chief staff officer. Haig landed the plum position shortly after having lent French £2,500 to avoid bankruptcy. Though some see the timing of the two events as no coincidence and believe that Haig was able to use the debt as leverage for an entire decade, the two officers remained rather close (for Haig) and devoted to the cause of the cavalry. Shortly after arriving in Cape Colony, French and Haig took part in the confused Battle of Elandslaagte. In the campaigning that followed Haig played his role well, but he longed for his own command.  He received his chance in early 1902 by leading a mobile column engaged in chasing the elusive Boers and later took over command of the 17th Lancers. 


Haig in South Africa


His battlefield experiences in South Africa proved formative for Haig. The British military, lacking a true general staff system, had initially performed poorly. Realizing the need for change, Haig would, in time, become a leading reformer. Haig also learned the value of machine guns in combat, commenting often on their indispensability and of the need for more of such weapons. His appreciation of the machine gun is important, for it is a leading tenet of the traditionalist school that Haig misunderstood and undervalued its use and centrality to the Great War. Haig, though, remained mostly concerned with the future of his beloved cavalry, for some leading figures, including Lord Roberts, contended that the British experience in South Africa indicated that cavalry would best be utilized in combat as mounted infantry..

Haig, now a leading cavalry theorist, returned to Edinburgh for a brief stint in regimental command, and became aide-de-camp to King Edward VII. From this point on, Haig would enjoy a rather close relationship with King Edward and his successor, King George V. It was certain that Haig had made the proper social connections for advancement, connections he would work hard to cultivate and broaden. His record having caught the attention of General Sir Horatio Kitchener, the commander-in-chief in India, Haig soon departed Britain to take over the post of inspector general of cavalry in India, charged with the training and modernization of the cavalry of the subcontinent. During nearly three years of work Haig achieved considerable success in part through the institution of an advanced system of staff tactical exercises for training purposes.

Perhaps the most meaningful event in Haig’s life during this time was personal, not military. On leave in Britain in 1905, Haig met Dorothy Vivian, one of Queen Alexandra’s maids of honor. Haig had never spared much time for social niceties or relations with women. However, at age 44 he found himself quite taken with Dorothy Vivian. Their courtship was something of a whirlwind—engaged within a week and married in Buckingham Palace within a month of their first meeting. While Haig served in India, momentous events were taking place in Britain. The poor performance of the military during the Boer War caused Britain to pause and take stock of the organization of its armed forces. Beginning with the investigation of the Esher Committee into the nature of the War Office, it quickly became apparent that the organization of the British military was far behind the times and needed an immediate and drastic overhaul.


Lord Haldane


Matters came to a head in 1906 with the election victory of the reform-minded Liberal Party. As a result, Richard Haldane took over as the new secretary of state for war, with a mandate to modernize the British military and make it capable of playing a major role in any possible European conflict or major colonial clash. With Haig serving as his "right-hand man," Haldane first went about the construction of the British Expeditionary Force (BEF). The War Office concluded that in time of continental war Britain would send a force of six infantry divisions and one cavalry division to France. By this point in his career Douglas Haig was already well-positioned to play a major role should that expeditionary force ever be deployed.

Saturday, August 20, 2022

South Africa's Victorious Campaign in Southwest Africa—A Roads Classic


The July 1915 conquest of German Southwest Africa was a marked triumph for the British campaign in Africa. The Southwest Africa campaign was the only World War I campaign planned, executed, and successfully completed by a British Dominion.  German Southwest Africa (now Namibia) was a large territory, which was six times the size of England and was Germany’s second largest colony. 


The origin of the South African campaign against the German territory is rooted in the aftermath of the outbreak of World War I. Upon the outbreak of the war, South African prime minister Louis Botha telegraphed London and told the London authorities that the imperial troops could be released and the South African Defense Force would guard the Dominion. After conveying the Crown’s thanks, Botha was told that “if his troops could seize such parts of German Southwest Africa as would give them command of Swakopmund, Lüderitzbucht, and the wireless stations there or in the interior, it would be a great and urgent imperial service.” The South Africans were able to muster a 50,000-strong force and landed a force at Lüderitzbucht in September of 1914. 

In opposition to the South African force, the Germans were able to put less than 3,000 Schutztruppe in the field and call upon roughly 7,000 male settlers to bolster their numbers. German colonial officials were unprepared for war and the German government held to the maxim that the colonies must be defended in the North Sea. The Germans counted on the Boers rising up to aid their efforts and stockpiled weapons in the case of such an uprising. An uprising occurred in October 1914 and the Southwest Africa campaign came to an abrupt halt.

General Louis Botha with Two of His Soldiers

After putting down the Boer uprising, Botha telegraphed London that he would resume campaigning on 28 November 1914. Botha assembled his troops, which included South Africans, Rhodesians, and an armored car regiment, at Swakopmund and began to move inward across the Namib Desert. During this campaign, the South Africans encountered German land mines and poisoned wells. In mid-April Botha’s northern force marched inland against stiff German resistance and Jan Smuts’s southern force began to advance. This was the beginning of the final advance of the South African forces against the remaining German forces.

On 5 May 1915, Botha captured the rail center of Karibib and later captured the colonial capital of Windhoek without a fight. After the capture of Windhoek, Botha met with German officials to discuss terms and stated his terms as unconditional surrender. The South Africans pressed on, liberating prisoner of war camps, and closing in on German forces. The German forces were in a hopeless position, outnumbered in a desolate area, and with no chance of resupply. On 9 July 1915, the German forces surrendered.

The campaign was completed efficiently with minimal loss of life. The South African forces lost 113 killed to the Germans' 1,331. Botha defeated both the German forces and the Boer uprising, while at the same time securing South Africa’s borders and increasing the security of Britain’s ocean line to the east. The campaign provided a great service in securing imperial communications and gaining control of one of Germany’s larger colonies. The campaign was a quick British victory and resulted in one of the first of many conquests of German colonies by Allied forces.