Now all roads lead to France and heavy is the tread
Of the living; but the dead returning lightly dance.
Edward Thomas, Roads

Monday, February 28, 2022

7 August 1915: A Tragic Charge at the Nek


The Nek Today, Baby 700 Just Beyond, Battleship Hill
in Distance

Click on Image to Enlarge


The Nek, described as the "size of three tennis courts," was a vitally important position on the northern end of the ANZAC front line and the scene of a tragic attack by the 3rd Light Horse Brigade at dawn on 7 August 1915. It was a narrow bridge of land that stretched between Russell's Top and Baby 700 across the top of Monash Valley. The Turkish 8-levels-deep trenches on the slopes of Baby 700 allowed them to dominate the Australian positions below.


Anzac Sector: Positions of the Nek and Baby 700


As part of the diversionary effort for the August Offensive, the 3rd Light Horse was ordered to attack the Turkish trenches at the Nek at 4:30 a.m. on 7 August to support an attack on Baby 700 by New Zealand troops who were to have captured Chunuk Bair the previous evening. The attack commenced with a bombardment of the Turkish positions by a destroyer steaming offshore, but the bulk of the shells fell beyond their target and the bombardment ended seven minutes early. Instead of charging at this point, the officers of the light horse held their men back until the appointed time for the attack arrived. This gave the Turks time to man their positions, having sought shelter during the bombardment.


Photo Taken During Construction of the Nek Cemetery
with Opposing Lines Highlighted


The first wave of light horsemen from the 8th Light Horse Regiment were shot down by Turkish rifle and machine-gun fire. The second line, also from the 8th, scrambled over the dead and wounded of the first line to make their attack, and suffered the same fate. Cancellation of the attack was proposed, but was rejected by Major John Antill, who had taken over effective command of the 3rd Brigade. The third line of soldiers, from the 10th Light Horse, went over the top and were also shot down. Cancellation was again suggested, but before a decision was made, the right flank of the fourth line charged as a result of a misunderstanding, and the rest of the line followed. They too were mowed down by the Turkish fire. The 8th Light Horse suffered 234 casualties, 154 fatal; and the 10th, suffered 138 casualties, 80 fatal.


Survivors of the 10th Light Horse with Body Bags of
Their Fallen Mates

Source: Australian War Memorial; YouTube


Sunday, February 27, 2022

The Dual Monarchy's Approach to Mobilization


Franz Josef Reviews a Regiment Before the War


Historian Alexander Watson argues that the governments of Germany and Austria-Hungary started the war with different levels of preparedness and approaches to public support for the war. The two states’ techniques for mobilizing their armies and civilian populations in 1914 had consequences for not only their conduct of the war but also the outcome of the revolutions that followed from their defeat in 1918. The German government relied on popular enthusiasm as symbolized by the Burgfrieden, a political compromise between all the political parties in the Reichstag, including the Social Democrats.


The Empire's Citizens Learn of War

The leaders of the Dual Monarchy, in contrast, were suspicious of popular mobilization. Their prewar plans eschewed civilian participation in favor of military control. Franz Joseph refused to recall the Austrian Reichsrat to cast a vote in support of the war. Instead, the Austrian Parliament building was turned into a military hospital. The Habsburg leaders came to embrace civilian mobilization along national and ethnic lines. This decision haunted them in the last years of the war. By 1918, the nationalities' support for the dynasty had flagged because of chronic food shortages and the political stalemate over constitutional reforms in both halves of the Dual Monarchy.


Soldiers Departing for the Front


(From Matthew Lungerhausen's review of Ring of Steel: Germany and Austria-Hungary in WWI on H-Net)

Saturday, February 26, 2022

George Patton's Letter Home After St. Mihiel—A Roads Classic

This is Patton's firsthand account of the first tank attack in American history, which in large part he personally led.

Official Army Art Depiction of the Initial Attack of Patton's Tanks at Seicheprey

20 September 1918
Dear Papa, 

We have all been in one fine fight and it was not half so exciting as I had hoped, not as exciting as affairs in Mexico, because there was ‘so much company. When the shelling first started I had some doubts about the advisability of sticking my head over the parapet, but it is just like taking a cold bath, once you get in, it is all right. And I soon got out and sat on the parapet. At seven o'clock I moved forward and passed some dead and wounded. I saw one fellow in a shell hole holding his rifle and sitting down I thought he was hiding and went to cuss him out, he had a bullet over his right eye and was dead. 

Patton after the War
Already the Army's Leading
Tank Commander
As my telephone wire ran out at this point I left the adjutant there and went forward with a lieutenant and four runners to find the tanks, the whole country was alive with them crawling over trenches and into the woods. I t was fine but I could not see my right battalion so went to look for it, in doing so we passed through several town under shell fire but none did more than throw dust on us. I admit that I wanted to duck and probably did at first but soon saw the futility of dodging fate, besides I was the only officer around who had left on his shoulder straps and I had to live up to them. It was much easier than you would think and the feeling, foolish probably, of being admired by the men lying down is a  great stimulus.

I walked right along the firing line of one brigade they were all in shell holes except the general [Douglas MacArthur] who was standing on a little hill, I joined him and the creeping barrage came along toward us, but it was very thin and not dangerous. I think each one wanted to leave but each hated to say so, so we let it come over us. The infantry were held up at a town so I happened to find some tanks and sent them through it I walked behind and some boshe surrendered to me. At the next town all but one tank was out of sight and as the infantry would not go in I got on top of the tank to hearten the driver and we went in, that was most exciting as there were plenty of boshe – we took thirty.

On leaving the town I was still sitting sidewise on top of the tank with my legs hanging down on the left side when all at once I noticed all the paint start to chip off the other side and at the same time I noticed machine guns, I dismounted in haste and got in a shell hole, which was none too large every time I started to get out the boshe shot at me. I was on the point of getting scared as I was about a hundred yards ahead of the infantry and all alone in the field. If I went back, the infantry would think I was running and there was no reason to go forward alone. All the time the infernal tank was going on alone as the men had not noticed my hurried departure. At last the bright thought occurred to me that I could move across the front in an oblique direction and not appear to run yet at the same time get back. This I did listening for the machine guns with all my ears, and laying down in a great hurry when I heard them, in this manner I hoped to beat the bullets to me. Sometime I will figure the speed of sounds and bullets and see if I was right. It is the only use I know of that math has ever been to me. 

I found the Major of the infantry and asked him if he would come on after the tank. He would not as the next battalion on his left had not come up (he was killed ten minutes later) Then I drew a long breath and went after the tank on foot as I could not let it be going against a whole town alone. It is strange but quite true that at this time I was not the least scared, as I had the idea of getting the tank fixed in my head. I did not even fear the bullets ,though I could see the guns spitting at me, I did however run like H ***. On reaching the tank about four hundred yards out in the field I tapped on the back door with my stick, and thank God it was a long one. The sergeant looked out and saluted and said what do you want now Colonel. I told him to turn and come back – he was much depressed. I walked just ahead of him on the return trip and was quite safe. We now got five tanks and decided to attack the town but one of the tanks started shooting at our machine guns and I had to go out again and stop it. A third time I went out as the tanks were keeping too far to the right but the last time was not bad as the machine gunner were mostly dead or chased away by the tanks. We took the town, 4 field gun and 16 machine guns.

Then I walked along the battle front to see how the left battalion had gotten on. It was a very long way and I had had no sleep for four nights and no food all the day as I lost my sack chasing a boche, I got some crackers off a dead one (he had not blood on them as in Polk's story) they were very good but I would have given a lot for a drink of the brandy I had had in my sack. The Major of the left battalion was crying because he had no more gas. He was very tired and had a bullet through his nose, I comforted him and started home alone to get some gas. It was most interesting over the battle field, like the books, but much less dramatic. The dead were about mostly hit in the head. There were a lot of our men stripping off buttons and other things but they always covered the face of the dead in a nice way.

I saw one very amusing thing which I would have like to have photographed. Right in the middle of a large field where there had never been a trench was a shell hole from a 9.7 gun – the hole was at least 8 feet deep and 15 across – on the edge of it was a dead rat, not a large healthy rat but a small field rat not over twice the size of a mouse. No wonder the war costs so much.

Jonville-en-Woevre, Captured by Patton's Tanks, 13 September 1918

On the thirteenth we did nothing but on the fourteenth the left battalion personally conducted by me went to hunt for the enemy. We found the only place on the entire front where for the space of half a mile there were no troops we went through and were attacked by the boshe, we drove them six miles, took a town of Jonville, on the Hindenburg line, [a] battery of field guns, 12 machine guns, but no prisoners.  Then finding that we were eight miles ahead of our own line, and that all the canon in that part of Germany were shooting at us, we withdrew with only four men hit. I was in at the start of this very fine feat of arms, but not at the finish as I was ordered back just after thet anks started and before we knew the boshe were there. We withdrew that night – total loses 4 men killed 4 officers and 4 men wounded. 

I am writing this in what was once a house but what is now a sort of quay. The boshe shell us at seven thirty each night. It is now that time so I will stop and put this in an envelope . This is a very egotistical letter but interesting as it shows that vanity is stronger than fear and that in war, as now waged, there is little of the element of fear, it is too well organized and too stupendous. I am very well much love to all.

Your devoted son

George


A week after he wrote this letter, Patton was wounded in the Meuse-Argonne Offensive.  He was hit in his posterior and worried afterward that he would become known as "Half-ass George."

Friday, February 25, 2022

Portrait of the Royal Navy's Brass


Naval Officers of World War I
by Sir Arthur Stockdale Cope
National Portrait Gallery
(8.7 ft x 16.9 ft)

Since we featured Royal Navy Seaman William Thomas yesterday, I thought today we might give attention to the Royal Navy's brass,  This massive oil  featuring twenty-two admirals involved in the First World War is from the collection of the National Portrait Gallery, which provides the following background information on the painting and—most helpfully—an identifying key of the individual admirals. The painting is displayed at 508px, but if you click on it or download it, the size is 1000px

About the Painting

The painting is set in the Admiralty Board Room at the Old Admiralty Office in Whitehall, London, and presents the twenty-two figures in a measured composition, some standing and some seated. The room retains many of the original features from 1725, the year in which the architect Thomas Ripley completed the Admiralty building, but the arrangement of the figures themselves is imagined. According to a contemporary naval correspondent, the significant, strategic problems of the late war would never have been deliberated over in this particular room. He stated that staff discussions and deliberations of this kind almost invariably took place in the room of the Chief or Deputy Chief of the Naval Staff, where the necessary charts and documents were made available. Indeed, he claims that some of the officers depicted had probably never even been inside the Board Room itself. This situation, therefore, like Sargent’s and Guthrie’s, could never have happened and had to be constructed almost entirely from the artist’s own mind.

In Cope’s painting, we can see an eighteenth-century wind dial on the wall behind the officers, surrounded by elaborate, limewood, carvings of nautical instruments. The dial was linked mechanically to a metal vane on the roof so the senior officers were always aware of the wind direction during their meetings. In addition to this, a full-length portrait of Lord Nelson by Leonardo Guzzardi hangs on the wall to the far left of the figures, in the same position it is in today. With these decorative elements and the knowledge that it was in this room that Nelson and other naval commanders’ dispatches were read, including that which told of the victory at Trafalgar and of Nelson’s death, this setting recalls distinct memories of the great naval encounters of the past.

Who's Left Out?

Members of the public at the time the painting was first exhibited were critical of the omission of certain distinguished officers. These include, specifically, Lord Fisher and Admiral Sir Henry Jackson, both of whom held the post of First Sea Lord during the war. It is unclear why Jackson was absent in the final work, although the reason could be that there was simply not enough room for additional figures. Fisher, however, is known to have been barely on speaking terms with anyone by 1918, after coming out of retirement at the request of Winston Churchill but then arguing with him bitterly and retiring again. He therefore refused to have anything to do with this particular project.

Identifying the Admirals

Click on Image to Enlarge


Thursday, February 24, 2022

Remembering a Veteran: William Thomas, Seaman & Boatman, Royal Navy


William Thomas, Boy II,
Sometime Around the Turn of the Century


By David F. Beer

My grandfather, William Thomas, was born on 1 June 1880 and joined the Royal Navy on 27 January 1896, having exaggerated his age by one year. His initial rank was Boy II, but by June of 1898 he had advanced to Ordinary Seaman. He was at sea for years on the China Station before the Great War began, but on 1 August 1914 he was assigned as an Able Seaman to the battleship HMS Ocean.

I suffer the same regret so many of us do: why didn’t I ask my grandad about his navy life while I still had the chance? He was an affable old chap in the ‘40s and ’50s who enjoyed a pipe of tobacco and an occasional drink. We chatted a lot whenever I saw him, and there would have been time to ask about his long naval life, but young gormless twit that I was then, it never occurred to me. All I remember is that his navy hammock, which he had slept in for years, was folded away in a corner of his garden shed.

Fortunately, my older brother, Peter, at one point acquired a copy of grandad’s Certificate of Service in the Royal Navy: four handwritten sheets with the names and dates of every ship he served on.  (I've included the list of those ships at the end of this article.) There were many, but with an interest in World War One, I want to focus on two: HMS Ocean and HMS Albion.


William Thomas During the War


Thirty-four years old by 1914, William Thomas had come a long way—and been to many ports—when war broke out.  A few days before war was declared he found himself as an Able Seaman aboard HMS Ocean. She was a pre-dreadnought battleship launched in 1898 that had seen service in the Mediterranean and the Far East. Able Seaman Thomas had been on board for some six months when Ocean was transferred to the Dardanelles in late February 1915 to participate in events there. He was on her when she sank off Helles on 18 March 1915. 

Life aboard Ocean would have been hectic during her short time on station at the Dardanelles. On 28 February, she was firing at Turkish positions on the peninsula and trying to locate guns active near Sedd el Bahr, at the tip of Cape Helles.  She and HMS Majestic came under fire from several Ottoman batteries, including howitzers. On 4 March, she supported the landings of two companies of Marines at Sedd el Bahr. More gunnery battles ensued on a daily basis.  On 18 March, Ocean joined ten British battleships and one battlecruiser and four French battleships to attack the Ottoman defenses.  The battleships were to enter The Narrows and suppress the fortresses while minesweepers cleared paths in the Ottoman minefields.

This operation failed. Several ships took considerable damage from Turkish shore batteries. The French battleship Bouvet struck a mine and exploded with a terrible loss of life. HMS Irresistible was disabled by a mine in Erenköy Bay. Ocean was sent to tow her out, but ran aground while trying and, after freeing herself, was unable to take Irresistible under tow because of the shallow water plus Irresistible's increasing list and heavy enemy fire. Ocean then took off the remaining members of Irresistible's crew and left the abandoned battleship, which sank at around 19:30 on 18 March.


Rescued Crewmembers from HMS Ocean


While retreating, Ocean was hit by artillery fire and then struck a drifting mine at around 19:00. According to records, “her starboard coal bunkers and passageways flooded, her steering jammed hard to port, and she took on a list of 15° to starboard. She came under [more] fire from shore and began taking hits, which flooded her starboard engine room and prevented steering repairs.” Three destroyers came alongside and collected her crew, including my grandfather. She then drifted into Morto Bay, an inlet on the southwest tip of Cape Helles, still under fire, and sank there at about 22:30 on 18 March. No one saw her go down. The next day Able Seaman Thomas was transferred to nearby HMS Albion.

Being aboard Albion was no picnic. She had supported the first Allied landings in late February and early March 1915 and was already battle-damaged. William Thomas was present as she supported the main landings at V Beach at Cape Helles on 25 April 1915. According to my brother, our granddad was in charge of one of the landing boats at this time and was horrified at how badly the troops were torn up by Ottoman gunfire. Three days later, the Albion suffered significant damage from enemy shore batteries during an attack on Krithia. This forced her to retire for repairs to Mudros, the small militarized Greek port on the island of Lemnos some 31 miles away. Back in action on 2 May 1915, she was again damaged, and returned to Mudros once more.


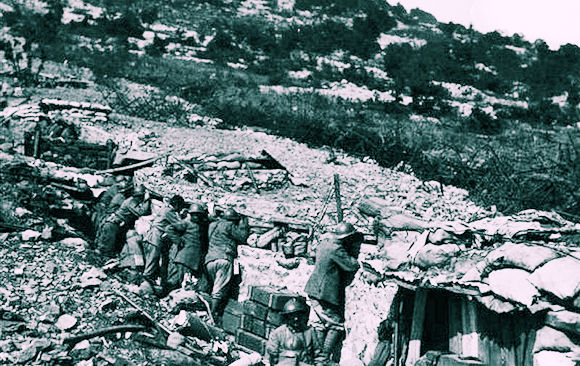
Depiction of the Landings on V Beach, 25 April 1915
William Thomas Was in Charge of One of the Towed
Landing Boats Shown on the Left


When Albion again returned to Helles, she had more bad luck. On the night of 22–23 May 1915, she beached on a sandbank off Gaba Tepe. She then came under heavy fire from Ottoman shore batteries, and about 200 fragmentation shells hit her. The crew tried to free her from the sandbank by using the recoil of her main guns all at once. This didn’t work, but she was towed to safety by another ship on 24 May, while still firing on the Ottoman forts.

Once again, the ship left to be repaired and spent the rest of May and June being refitted in Malta. She then went on to the Salonika front to assist the French Navy in a blockade of the Greek and Bulgarian coasts and in the transportation of British Army troops. She served on the Salonika Station until April 1916, then returned to Britain to serve as a guard ship. Albion was scrapped in 1920.


HMS Albion Under Fire at Gallipoli
Note Splashes of Turkish Shells


William Thomas served on HMS Albion until 19 November 1915, so he saw much of the action at Salonika. Again, landing troops under adverse conditions would have kept him and the ship busy. Finishing up his years in the Royal Navy, he saw brief stints on the cruiser St. George and finally at HMS Excellent, a shore establishment on Whale Island near Portsmouth in southern England. 

On retirement, he joined HM Coastguards, then known as the Coast Watching Forces, and was with them until the end of World War Two. In that war, he patrolled along the coasts of Devon and Somerset on foot with his loaded Lee-Enfield 303 during the German bomber raids on Cardiff and Swansea across the Bristol Channel. 


William Thomas and His Family After the War
 Daughter Eva Kathleen Mary Thomas (Left) Is My Mother


He had been married since his Navy days and had three children, his daughter Eva in the picture (taken around 1929) being my mother. She had been born in 1909 while her father was on HMS Cumberland. One son had tragically died of cancer as a teenager, the other was to later emigrate to Australia. My grandfather retired once again in 1945 as Chief Coastguard in Clovelly, Devon. He and his wife quietly retired to a small house in Taunton, Somerset, where he enjoyed his pipe and "baccy." He died in 1960.

NOTE: One of the most helpful books I have, replete with maps and photos, is Philip Haythornthwaite’s Gallipoli 1915: Frontal Assault on Turkey. Praeger Illustrated Military History Series, Westport, Connecticut 2004.

Here's the list of Grandfather's ships. Click on the image to enlarge:


Wednesday, February 23, 2022

The Worst Battlefield of the Italian Front: The Carso Plateau

The Carso or "Karst" is a barren limestone plateau partly in present-day Italy and partly in Slovenia, SE of Gorizia, that measures about 50 square miles. It is highly permeable resulting in high solubility and fissuration. This causes the formation of innumerable subterranean caves and sinkholes, often completely invisible. Numerous gullies crisscross the surface. A similar geologic formation, the Bainsezza Plateau, is just north of the Carso on the other side of the wooded Selva di Ternova. "Karst" has become a generic term used to describe similar rocky landscapes around the world.


War correspondent E. Alexander Powell described the Carso vividly:

Imagine a vast limestone plateau, varying in height from 700 to 2,500 feet, which is as treeless and waterless as the deserts of Chihuahua, as desolate and forbidding as the Dakota Bad Lands, with a surface as torn and twisted and jagged as the lava beds of Utah, and with a summer climate like that of Death Valley in July. That is the Carso.


A Frontline Italian Trench During the Fighting


This great tableland of rock, which begins at Gorizia, approaches close to the shores of the Adriatic between Monfalcone and Trieste, and runs southeastward into Istria, links the Alpine system with the Balkan ranges. Its surface of naked, sun-flayed rock is broken here and there with gigantic heaps of piled stone, with caves and caverns, with sombre marshes which sometimes become gloomy and forbidding lakes, and with peculiar crater-like depressions called dolinas, formed by centuries of erosion. Such scanty vegetation as there is, is confined to these dolinas, which form the only oases in this barren and thirsty land. The whole region is swept by the Bora, a wind which is the enemy alike of plant and man. Save for the lizards that bask upon its furnace-like floors, the Carso is as lifeless as it is treeless and waterless. No bird and scarcely an insect can find nourishment over vast spaces of this sun-scorched solitude; even the hardy mountain grass withers and dies of a broken heart. So powerful is the sun that eggs can be cooked without a fire. Metal objects, such as rifles and equipment, when left exposed, quickly become too hot to touch. The bodies of the soldiers who fall on the Carso are not infrequently found to have been baked hard and mummified after lying for a day or two on that oven-like floor of stone.

The troops hated the area, describing the Carso as "a howling wilderness of stones sharp as knives." The summer wind was crushing and the winter featured a bitter wind they called the "Bora." It was through the Carso, however, that the Italian Army had to advance to capture its objective of Trieste. Many of the eleven battles of the Isonzo—all Italian offensives—had the Carso as a primary focus or a major diversion.


Looking North, the Mte. San Michele Sector
As It Appears Today


In August 1916 during the 6th Battle of the Isonzo, the commanding outpost of the Hungarian forces defending the Carso, Mte. San Michele, was captured by Italian forces at enormous cost. Much of the remainder of the plateau was captured during the 10th Isonzo in 1917, but again with severe casualties. Gas warfare was used extensively on the Carso making the fighting especially gruesome for both sides. During the Battle of Caporetto, the Carso was abandoned by Italy's Third Army under the Duke of Aosta. The region was reoccupied at the time of the Armistice.


Cave Used for Shelter by Hungarian Defenders


The area around Mte. San Michele is now a sacred area and is a combination memorial and open-air museum with a small enclosed museum on the summit. A small village named San Martino, the site of an Austrian gas attack in June 1916, was destroyed in the war and later immortalized by Giuseppe Ungaretti's poem I Am a Creature, which he composed while serving nearby in August 1916. An enormous war memorial commemorating the battles on the plateau was opened in 1940 at Redipuglia and a large Austro-Hungarian cemetery is nearby at Fogliano. A tour of the Carso and the monuments around Redipuglia is a "must" for anyone visiting the Italian Front.


I AM A CREATURE

Like this stone of
San Michele

as cold
as hard
as thoroughly dried

as refractory
as deprived of spirit

Like this stone
is my weeping that can't
be seen

Living discounts death

Tuesday, February 22, 2022

Automatic Weapons of the Russian Army


By Vladimir Glazkov
MMPbooks 2020. Distributed by Casemate
Bruce Sloan, Reviewer


The Imperial Russian Army, during the Great War, used a variety of both standard Russian weapons and imported or captured arms. Weapons of War: Automatic Weapons of the Russian Army provides the history and description of these weapons from inception and design development, through the Great War. It also offers detailed nomenclature and action of each, plus their use in combat, both on the ground & in the air.


Click on Image to Enlarge


In Chapter 1, “Automatic Rifles,” the author discusses the Federov Automatic & Machine Rifles, the Tokarev Automatic Rifle, the Roshchepey Automatic Rifle, the Shchukin Automatic Rifle, the Yasnikov Automatic Rifle and an early design (not manufactured) for a Kalashnikov Automatic Rifle. Succeeding chapters offer both crew-served and individual automatic weapons, including their various mounts, tripods, and carriages. Also discussed are ammunition, transportation, and supply.

Other nations automatic weapons discussed by the author, include:

  • The Maxim machine gun, designed by the American-born British inventor Hiram S. Maxim, an extremely detailed account, including the Vickers-Maxim "light" machine gun
  • The German-Austrian Schwarzlose machine gun
  • The German MG 08, their Maxim machine gun
  • The American Colt machine gun – “The Potato Digger”
  • The American Hotchkiss machine gun—original design by an Austrian
  • The Danish Madson machine gun
  • The French Chauchat machine rifle,
  • The American-designed Lewis Gun
  • The Hotchkiss portative machine rifle

Each chapter presents many full-color photographs and detailed drawings of the weapons, plus numerous black-and-white period photographs of the guns in use.

I found the book to be very informative for the reasonably knowledgeable gun enthusiast. However, it is definitely not for the uninitiated. Much of the discussion of the guns themselves is very technical, and the diagrams are mostly in Russian without English notation or keys.

However, the photographs are great! And the general discussion is easily followed. I learned a lot, but I wish I had more knowledge of the nomenclature, workings, and actions of the weapons.

Bruce Sloan

Monday, February 21, 2022

Revisiting the Battle of Verdun


21 February 1916 — Opening Barrage of the Battle


One hundred and six years ago today, the Battle of Verdun began. Over the years we have presented a number of articles on this signature battle of the Great War.  Here are most of our articles that have focused on the Verdun. I've not listed overlapping articles or shorter pieces that I expanded on in longer articles. Click on each title listed below to read the article.


100 Years Ago: Fort Vaux Falls


18 December 1916: The Battle of Verdun Ends


Sunday, February 20, 2022

The Terms of Brest-Litovsk


After the October Revolution, which Trotsky had masterfully planned and executed, the new Soviet leadership quickly endorsed Vladimir's Ilich Lenin's “Decree on Peace,” urging all combatants to conclude a “just, democratic peace.” This, of course, was not at all to the liking of Russia's erstwhile allies. Germany, needless to say, was highly enthused about this. After all, the Kaiser had funded Lenin's "sealed train" trip back to Russia in hopes he would help sabotage the tsar's regime and end the war. This was the "deal" that Germany imposed on the now Communist-led government of Russia.


However, when the Germans lost the Great War, the Treaty of Brest-Litovsk was negated and the Bolsheviks managed to gain back much territory ceded to the Germans once they emerged victorious from their civil war. The challenge that the Bolsheviks placed before the world was not lost on the leaders of the Entente. Because of Woodrow Wilson's Fourteen Points, the Germans arrived at Versailles believing that they were about to negotiate a peace without annexation and indemnities.

Despite the best efforts of President Wilson, the Europeans were not ready to pursue peace without draconian consequences for the defeated foe. The Germans did it to the Russians and in the minds of the French and British, it was now their (the Germans') turn to suffer a devastating defeat. Ironically, the Imperial Army fell victim to the collapse of Russian society and was not decisively defeated by the Germans. And the German military entered the postwar period believing that the failure of civilian politicians and not their operational performance allowed the Entente to dictate the terms of the Treaty of Versailles. Both nations had to endure humiliating defeats although their respective armies had not been defeated. Harsh peace treaties and undefeated armies did little to resolve deeply rooted problems in both countries as they entered the post-World War I era. 

Source: Over the Top, February 2018