Now all roads lead to France and heavy is the tread
Of the living; but the dead returning lightly dance.
Edward Thomas, Roads

Sunday, November 10, 2013

The Red Poppy: Symbol of the Great War


Why the Red Poppy?


Click on Image to Expand


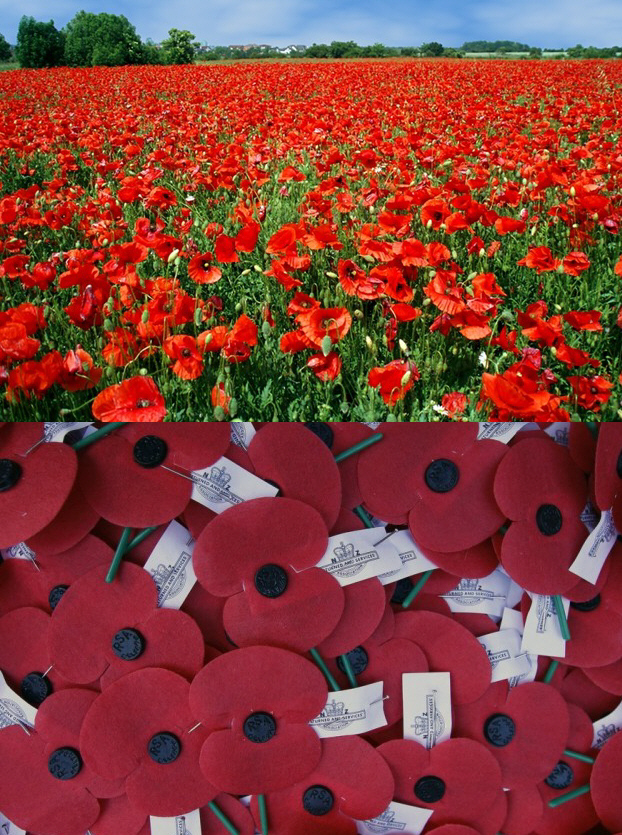
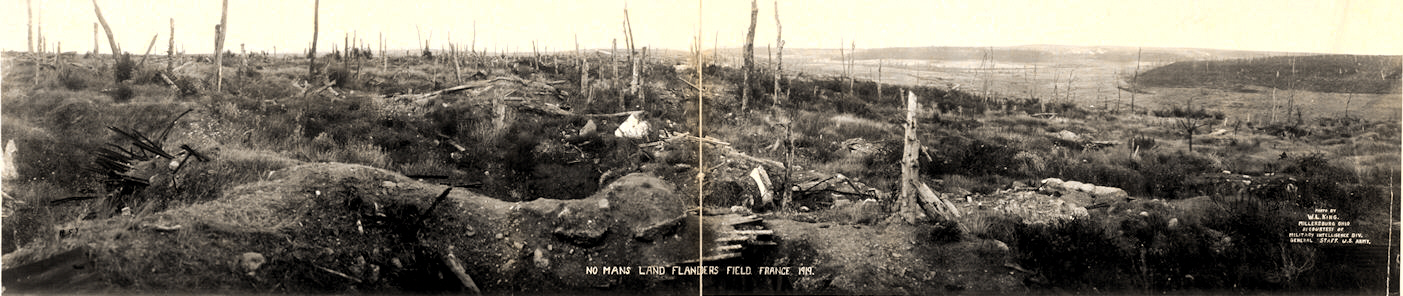
Long before the Great War, the red poppy had become a symbol of death, renewal, and life. The seeds of the flower can remain dormant in the earth for years but will blossom spectacularly when the soil is churned. Beginning in late 1914, the fields of northern France and Flanders became the scene of stupendous disturbances. Red poppies soon appeared.

In 1915, at a Canadian dressing station north of Ypres on the Essex Farm, an exhausted physician named Lt. Col. John McCrae would take in the view of the poppy-strewn Salient and experience a moment of poetic inspiration. The veteran of the South African War was able to distill in a single vision the vitality of the red poppy symbol, his respect for the sacrifice made by his patients and dead comrades, and his intense feeling of obligation to them. McCrae would capture all of this in the most famous single poem of the First World War, "In Flanders Fields."

The doctor's work achieved immediate universal popularity, which was subsequently reinforced by his own death in 1918 from pneumonia and meningitis. He was buried in a military cemetery near Calais on the English Channel, thus becoming one with those of whom he wrote in his famous poem. Probably by the time of his interment, John McCrae's verse had forever bound the image of the red poppy to the memory of the Great War. The poppy was eventually adopted by the British and Canadian Legions as the symbol of remembrance of World War One and a means of raising funds for disabled veterans. An American war volunteer, Moina Michael, helped establish the symbol in the U.S., where the Veterans of Foreign Wars and the American Legion also embraced the red poppy tradition.


Click on Image to Expand


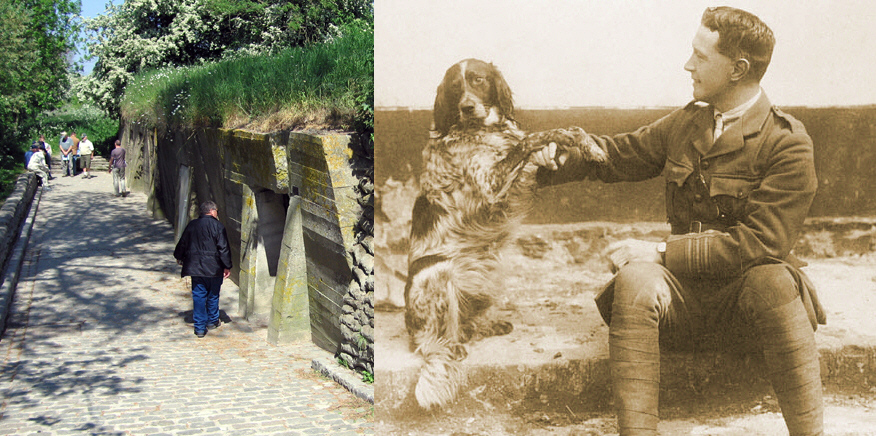
Essex Farm Dressing Station Today and John McCrae with Bonneau


In Flanders Fields

By John McCrae

In Flanders fields the poppies blow
Between the crosses, row by row,
That mark our place; and in the sky
The larks, still bravely singing, fly
Scarce heard among the guns below. 

We are the dead. Short days ago
We lived, felt dawn, saw sunset glow,
Loved, and were loved, and now we lie
                    In Flanders fields.

Take up our quarrel with the foe;
To you from failing hands we throw
The torch; be yours to hold it high.
If ye break faith with us who die
We shall not sleep, though poppies grow
                    In Flanders fields.

Saturday, November 9, 2013

Origins of No Man's Land


Click on Image to Expand


No Man's Land, Ypres Salient, 1919

The term "no man’s land" came into general use in English during the First World War, referring to uninhabitable areas that saw the fiercest of the fighting between the two sides of the conflict; the use of the term, many centuries earlier referring to an isolated patch of land outside the City of London, is indicative of a pattern of language-change produced by the war – by 1920 "Niemandsland" was a widely used term in German. 

 Text from the British Museum Website, photo from the Library of Congress


Friday, November 8, 2013

Germany and Total War


Click on Image to Expand


A 1917 magazine illustration for home front consumption portrays a German Army with irresistible battlefield power.


Regardless of the fighting merits of the German military, historian Paul Kennedy sheds light on the bigger story:

Germany actually mobilized more men than Russia; but they had some problems which were not evident until the draining battles of 1916, Verdun and the Somme.  These led to the Hindenburg program of 1916 expanding munitions and adding controls to the German economy.  This led to greater financing measures, which also led to inflation.  Also, bottlenecks in industry [occurred], which had to be cured by increased infrastructure.  This called for more skilled workmen, who had to be demobilized from the army.  The Hindenburg Program catastrophically neglected agriculture, which brought the country to near starvation in 1918.  The underlying manpower problems affected everything.


The Rise and Fall of the Great Powers (pg. 269)

Image from Tony Langley

Thursday, November 7, 2013

Two Battleship Survivors of Jutland with Notable Service in World War II

Click on Image to Expand

SMS Schleswig-Holstein


The pre-dreadnought German battleship SMS Schleswig-Holstein saw action during the engagement, and was hit by one large-caliber shell. After the battle, Schleswig-Holstein was relegated to guard duties in the mouth of the Elbe River before being decommissioned in late 1917. As one of the few battleships permitted for Germany by the terms of the Treaty of Versailles, Schleswig-Holstein was again pressed into fleet service in the 1920s. In 1935 the old battleship was converted into a training ship for naval cadets.

Another war would bring the ship its greatest historical moment. Schleswig-Holstein fired the first shots of World War II when she fired on the Polish base at Westerplatte in the early morning hours of 1 September 1939. The ship was used as a training vessel for the majority of the war and was sunk by British bombers in December 1944.

Click on Image to Expand


HMS Warspite


HMS Warspite was a Queen Elizabeth-class dreadnought that was part of the battleship contingent assigned to Beatty's group of battlecruisers. In the big battle the ship began its dual reputation as a tough fighter with a lot of bad luck. Warspite suffered a hit on her rudder and spent half an hour circling within easy range and sight of the High Seas Fleet, exposed to their full artillery, but she was still game to continue the battle after her steering was jury-rigged. Despite twenty-nine hits by 11- and 12-inch shells on her, Warspite made it back to base under her own power and lived to fight another day. Later in the war she was damaged again after a nighttime collision with another battleship, suffered from a boiler fire, and was rocked when nearby HMS Vanguard exploded while at anchor. In the interwar period she became the sister ship of USS Arizona and was still in service when the Second World War broke out.


Once again Warspite proved valiant in battle, in actions from Norway to the Indian Ocean. Once again she suffered much damage: a 500-lb bomb damaged her starboard batteries and later an air-launched missile did crippling damage off Salerno. Being the only major ship that was present at the Great War's Battle of Jutland and at the Normandy invasion of World War II was probably Warspite's most memorable distinction.   Sadly, the scrapping of Warspite was beset with misfortune and bungling – a dismal end to the life of a great warship.

Wednesday, November 6, 2013

Three Mines Detonating


Other than for the Hawthorne Mine of 1 July 1916, photos at the moment of detonation are rather rare in my experience. Here are three I've come across. They do give a sense of the power of these sub-nuclear but massive explosions.

Click on Image to Expand

From the top: An explosion in the Vosges Mountain Sector; an Austrian mine on Mte Lagazuoi in the Alps, 16 September 1917; a German photograph of a mine detonating on the Somme.


Tuesday, November 5, 2013

Hero: The Life and Legend of Lawrence of Arabia
Reviewed by Tony Langley


Hero: The Life and Legend of Lawrence of Arabia

by Michael Korda
Published by Autumn Press, 2012

It is a remarkable thing to realize that the man who led the original and authentic "sideshow of a sideshow" has become one of the most well known figures in 20th-century history. Indeed, a case can be made that T. E. Lawrence, better known to the general public as "Lawrence of Arabia," is now probably the single most famous individual to have participated in the Great War. While other military figures and statesmen from that momentous conflict are well known to students and historians, to the man in the street Lawrence is a more familiar figure than any Haig, Joffre, or Pershing.

This is, in no small part, largely due to the influence of modern media. From Lowell Thomas — American reporter, showman, and all-round promoter of money-making media events — to David Lean's epic motion picture and more than a hundred major books and other writings, T. E. Lawrence came to be rightly considered one of the 20th-century's most intriguing, heroic, and complex individuals ever to have been involved in military and political events.

Lawrence with Lowell Thomas


In this new, 700-page biography, Michael Korda has written one of the most captivating and largely sympathetic accounts of Lawrence's life yet. The strength of this book lies in how the author manages to weave elements of history and popular media culture and (often distorted) public awareness of this enigmatic and often contradictory-seeming person, into an intriguing and highly detailed story. He starts with the wartime experiences of Lawrence and from there goes back to childhood, touches the Great War again and then gives a detailed account of Lawrence's post-war life and further achievements, many of which were no less admirable and distinguished than the military exploits for which he is widely known.


Order Now
After more than a hundred books on this man, it might be pardonable to think that yet another Lawrence biography would be superfluous and consist of little more than a rehashing of events and explanations already voiced many times over. Korda's book, however, is more than that, for now that we are approaching the hundred-year mark we can see with greater clarity just how far reaching Lawrence was in his appreciation of the future consequences of decisions and miscalculations made during and immediately after the war. He was not only a brilliant military tactician, strategist, and thinker when it came to conducting, combating, and preventing insurgency warfare; Lawrence also knew how to apply his talents to statecraft, diplomacy, and geopolitics, as well as later in life to problems of mechanics and boat design and reforms in the then harsh set of military regulations in the British armed forces. A little-known fact is that after the war, Lawrence campaigned to abolish the death penalty for cowardice, an admirable stance from one to whom bravery in battle apparently came so easily.

Much has been made of the remark that Lawrence seemed to know how to "back into the limelight," a seeming contradiction of motives and ambition. While Michael Korda does not go about expressly addressing this character trait of Lawrence's, he does seem to provide an answer between the lines. Lawrence was a man driven to excellence by the force of his intelligence and learning. Whatever he did, he did to the utmost of his considerable abilities, be it preparing a thesis during his Oxford days, conducting archeological work in pre-war Syria, making maps for various British military commands, fighting and guiding a tribal insurgency and war, having a say (however small) at the greatest peace conference in modern times, or later being instrumental in helping to create three new nation states — two of which are still in existence now. He also wrote one of the great classics on warfare and has inspired military thinkers and leaders ever since.

Yet, for all these accomplishments, Lawrence remained a basically shy, reticent person, drawing back from physical contact.

As Michael Korda writes: "Few people have risen so high so quickly, or have voluntarily given up not only honors but power...without regret or bitterness. Fewer still have been so famous and tried so hard to live obscurely."

That is why the author thinks it more than appropriate to examine Lawrence's life anew and not to treat him as "an interesting neurotic" but more aptly as a visionary and a warrior, someone who "not only wrote an epic, but lived one'."

Tony Langley

Monday, November 4, 2013

Hurrah for the Next Man Who Dies!

Click on Image to Expand


When I was the membership chairman of the old Great War Society, we asked our new enlistees what got them interested in the First World War.  I was surprised at how many mentioned the 1938 film Dawn Patrol with Errol Flynn, Basil Rathbone, and David Niven.

The "show stopper" scene in that movie is not any of the combat sequences, but in the mess when the pilots drink a musical toast to the next man who dies. The lyrics used in the movie are an adaptation of a 19th-century poem out of India titled "The Revel" by Bartholomew Dowling. Here are the pilots singing their song:

Click on Image to Expand

Errol Flynn Leads the Singing


We meet ’neath the sounding rafter,
  And the walls around are bare;
They echo our peals of laughter
  It seems that the dead are there.

So,  stand to your glasses, steady!       
  This world is a world of lies.
Here's a toast to the dead already—
  Hurrah for the next man who dies!

Cut off from the land that bore us,
  Betray’d by the land we find,
The good men have gone before us,
  And only the dull left  most behind.

So,  stand to your glasses, steady!       
  This world is a world of lies.
Then here's a toast to the dead already—
  Hurrah for the next man who dies!

Sunday, November 3, 2013

Zeppelin Facts


Click on Image to Expand


Zeppelin L-15 was a representative example of the combat airship. It was 536 ft long and could carry a two-ton bomb load. After its commissioning in September 1915 it conducted eight scouting missions and three raids. On its last mission it was brought down in the Thames Estuary, 1 April 1916.


Some Interesting Facts About the Zeppelins at War

  • A total of 115 zeppelin-type airships was used by the German military in the First World War. The army and navy lost 53 airships and 379 highly trained officers and men, and 24 airships were so damaged they could not be used again.
  • The German zeppelin fleet was used much more for reconnaissance missions than bombing, with over 1200 sorties flown over the North Sea alone.
  • Parachutes were considered excess weight and, therefore, not carried.
  • In April 1917, zeppelin L-23 intercepted the Norwegian schooner Royal off the Danish coast, determined she was carrying contraband, put a prize crew aboard, and sailed the ship back to Germany.
  • History's Largest Zeppelin Attack: sixteen navy and army airship bombers against London on 2 September 1915 (13 arrived over target).
  • Deadliest Raid: L-13 against London on 15 September 1915 killed 22 people. Over 500 individuals died in Britain from air attacks.
  • A Victoria Cross was awarded to William Leefe Robinson of the Royal Flying Corps for shooting down Schütte Lanz SL-11 over London on the night of 2–3 September 1916, a feat that paved the way for the eventual defeat of the zeppelin as a bomber.
  • Incendiary bullets, which would prove the most lethal anti-zeppelin weapon, were developed in contravention of the Hague Convention. German use of gas in 1915 encouraged overlooking this "technicality."
  • 1915 was the best year for zeppelin crews. Not a single raider was lost to enemy fire.
  • Ferdinand Adolf August Heinrich Graf von Zeppelin's airship career was inspired by a balloon ascent he made in St. Paul, Minnesota, on 19 August 1863. A cavalry officer, he had been sent to the U.S. as an observer with the Union Army. 
  • Many European cities experienced zeppelin attacks, but possibly the most improbable urban target was Naples. It received 20 bombs from Bulgaria-based L-59 on the night of 11–12 March 1918.
  •  The late naval-air expert R.D. Layman considered the Royal Navy's sea-launched assault on the zeppelin sheds at Cuxhaven on Christmas Day, 1914, as the world's first carrier-based air strike.

Saturday, November 2, 2013

Hoover Institution Collection Available Online

Images from the Hoover Institution Archives


Founded to archive the record of the First World War, the Hoover Institution, located at Stanford University, now makes a lot of its holdings available on line. Many of their images are displayed in slideshows. Below is a montage of some interesting examples I've discovered while browsing their site.

The slideshows can be found here:
http://www.hoover.org/multimedia/slide-shows/28543


Click on Image to Expand


Top Row:  A cartoon showing the Russian bear chasing the Kaiser and Emperor Franz Josef up a tree; Soviet poster showing a Red Army soldier attacking some White Army generals; White Army commander Pyotr Nikolaevich Wrangel; Caricature of  Aleksandr Solzhenitsyn, who researched his works at the Hoover Institution.

Bottom Row:  A cartoon showing President Wilson as a cowboy towering over the Kaiser; a flour sack embroidered by Belgian women in appreciation of American relief to their country; President Hoover by the Hoover Tower in 1951.

Thursday, October 31, 2013

31 October 1914 –
The Western Front's Last Piece:
The Fight at Gheluvelt Chateau

It was the day the war of movement on the Western Front stopped. Afterward there would be no big breakthroughs until 1918, and forty-one months of trench warfare would ensue.  By mid-day on 31 October 1914 there were no more flanks, just one last gap in the entire line from the Swiss border to the English Channel where a breakthrough seemed possible. It was at a place five miles east of Ypres on the grounds of Gheluvelt Chateau, just north of the Menin Road. 

Gheluvelt Chateau Today

Shortly before noon the line of the British 1st Division was broken at Gheluvelt.  If at that moment German reinforcements available close at hand could thrust through the gap and spread out fanwise, they could have rolled up the defenders on either flank in their rear and simply broken the cohesion of the British in Flanders to pieces. The impulse of retreat began to seize the British troops. Already men and guns were streaming back towards Ypres. The Germans quickly assembled thirteen battalions for a final follow-through attack. 

General Charles FitzClarence commanding the British Army 1st Brigade, was nearby and saw the declining situation. At Polygon Wood north of Gheluvelt, he got hold of the 2nd Worcestershires, part of the reserve of the 2nd Division on the north, and ordered them to counterattack immediately. This movement had scarcely begun when a shell burst in Hooge Chateau, where the staff of both divisions had assembled for a conference, and practically destroyed them.

But the Worcestershires — a tiny force of eight officers and 360 men — swept all before them nonetheless. They fell upon their adversaries, who were mostly Bavarians, and drove them back in confusion from the chateau grounds. The line was reestablished.  The Western Front of the Great War was effectively completed. It would not move dramatically until the first Ludendorff Offensive of 1918.  General FitzClarence, sadly, did not have much longer to live. He died on 11 November 1914 in fighting along the Menin Road, where many more would fall in the remaining four years of war.

After the Victory: Gheluvelt, 31 October 1914


Wednesday, October 30, 2013

Remembering a Veteran:
Walter Draycot, Princess Patricia's Light Infantry, CEF

Contributed by Jane Mattisson


Twenty-eight years ago this month, Walter MacKay Draycot – rifleman, topographer, photographer and (unpublished) memoir writer – died in North Vancouver, Canada, at the age of 102. Born in 1885 in Leicestershire, England, Draycot served in the Boer War as a member of the 60th Rifles and Engineers. He emigrated to Canada in 1907, was employed for a few months by the Canadian Pacific Railway as a railroad worker, set up business as a farmer/merchant in Ontario in 1910, and in 1911 he settled in Lynn Valley on the west coast of Canada.

Walter Draycot at Vimy Ridge


When war was declared, Draycot was not slow to enlist despite his age (29). He signed up with his old Boer War regiment but was shortly afterward transferred to Princess Patricia’s Canadian Light Infantry. He performed a wide range of duties, as regimental barber, sketcher, topographer, and acting intelligence officer. Draycot described his war career in the third person, as follows:

On the outbreak of the 1914–18 War he was back again in England with his old regiment. While waiting to be Commissioned as an officer he was claimed by Colonel Farquar of the Famous Princess Patricia’s on the grounds he was a Canadian Citizen. His exploits have been written in an unpublished typed book. Appointed Military Topographer. Being the only exponent of that art in the Brigade of 4,000 men, he was sought by General Macdonnel for service in the 7th Canadian Infantry Brigade. Both the Division and Corps wanted his services, but Macdonnel retained him. Appointed the only Official Sketcher in the Canadian Army with credentials. Thrice wounded. Arrested several times as a spy, when sketching. Twice ‘gassed’; the last dose sent him to England where, after recovering, he conducted a school to teach officers the art of Military Sketching and Topography. After the War, some of his sketches were printed – see his book; it tells all.  

(Early Days in Lynn Valley, 13. The ‘book’ referred to is Draycot’s memoir Pawn No. 883: Being the Adventures of a Pawn in the Affairs of 1914–18, which is housed at the North Vancouver Museum & Archives, North Vancouver, BC. His sketch below provides a sanitized view of conditions at Vimy Ridge.)


Detail from Draycot's Vimy Sketch


Draycot fought at Ypres, the Somme, and Vimy Ridge. Vimy was his final battle. After being gassed, he was shipped to England for convalescence.


Draycot during his convalescence
(in the front row, farthest to the right)

Draycot’s memoir and diary entries contain details about the daily routines of the soldier as well as close shaves with death. Of the latter, one episode is particularly memorable and is described in the memoir as follows:

A small brook flowed through Sanctuary Wood. Any activity in this area could be seen by the observer in the Bird Cage. However, it was necessary to obtain information during daylight. Forgetful, as we all become when engrossed in a subject, my mind being on my work led me forward scanning here and there taking notes and measurements. Something compelled me to turn round. Horrors of Horrors! There was the Bird Cage – in full view! Stupefied, my blood froze at the sight. He could see me! My position was likened to an oasis in the desert .

Draycot’s war career was tinged with bitterness; enlisting as a private but doing the work of a trained topographer (he learned this from Baden Powell) and acting intelligence officer, he never forgave the army for its refusal to honour his temporary promotion to sergeant in 1916. The reason given was that Draycot could not be promoted permanently because, during much of the war, he was on temporary loan to other regiments as a topographer. Private he was – and private he would remain.

On returning to Lynn Valley after his convalescence, Draycot worked for the local community, as justice of the peace (from 1923 to 1975) and as a Scout leader. One year after his death on 21 October 1985, a statue was erected in Lynn Valley in his honour. Peacetime finally gave him the recognition that he was unable to gain in time of war.


Tuesday, October 29, 2013

Special Halloween Film Review:
Deathwatch: Religious Allegory or Great War Zombie Film – Or Both?


Deathwatch: Deliver Them From Evil

Lionsgate Films, DVD, 2003

Deathwatch Does an Excellent Job Depicting the Standard Trench Warfare Scenery


Dear Readers,


Our regular contributor on literary matters, David Beer – in his usual serious and insightful manner — has contributed, a review of what is, to our mutual understanding, the only known cross-genre World War One/ghoul film, Deathwatch, for our special Halloween posting.  David's review, which focuses on the movie's religious implications, stands alone and is worthy of your attention.  However, after your editor read the draft of the review, he came to the conclusion that David, who is usually au courant with the latest developments in popular culture, had overlooked (or chosen to avert his gaze from) a dimension of the film that is part of a truly big phenomenon these days.  His review sidesteps the "living dead," that is to say, the zombie, elements of Deathwatch. While being a little subtle in its "Z" symbolism and avoiding any use of the "Z" word in the script,   Deathwatch, nevertheless, has earned a place on various lists of "Best Zombie" productions—right up there with Walking DeadWorld War Z, and my personal favorite, Zombieland.  Since David passed over the zombie clues in his review, your editor has supplemented his text below with stills from the film that capture the film's zombie essence.  MH


Review by David F. Beer

This film brought to mind two lines from the last poem Isaac Rosenberg wrote before he was killed in action. The poem, “Through These Pale Cold Days,” describes suffering soldiers and states how "They see with living eyes/How long they have been dead." This is about as close to a spoiler as I want to go in discussing this horror film based on WWI. The surface plot is easily described. A group of British soldiers go over the top at night into the face of intense machine gun fire and exploding shells. Several standard trench warfare motifs are provided: the fear before the attack, the youngest soldier panicking and refusing to go over until threatened at gunpoint by an officer and helped by a sympathetic comrade, tangles of barbed wire to negotiate or get caught up in, mud containing bloated corpses, and the inevitable mowing down of men by the enemy’s furious fire power.


The Corpses Have a Peculiar Look to Them, However


It’s almost unbelievable that anyone could live through such a "stunt" but surprisingly the next scene shows a group of apparent survivors trudging over no man’s land in thick fog that they mistake for gas. When they discover it’s only fog and remove their masks, one soldier wonders what happened to the night — he can’t understand how it suddenly became light. Apart from the ominous and eerie background music we've heard from the beginning of the film, this is the first hint we get that all is not normal. Further hints will occur, however, such as a compass that no longer works, barbed wire that seems to have a life of its own, and blood that seeps from the mud in the German trench the survivors now occupy.

All but one of the Germans in the trench are dispatched quickly enough, but not before it’s apparent that they are paralyzed with fear not of the British soldiers but of a nameless and invisible force that has already been decimating them. They try to warn the British about it but to no avail. Gradually it overcomes all but the youngest and most innocent soldier, named Charlie Shakespeare, who in the end is able to leave the dark trench and walk out into the light — but not before he glimpses all his dead comrades sitting around a fire in a dark corner of the trench, seemingly alive.

Motion Detected Among the Dead


To arrive at an understanding of what director/writer Michael J. Bassett seems to have in mind in this film (and it’s admittedly open to interpretation) we have to absorb numerous oblique hints. Why, for example, is the subtitle of the film “Deliver them from evil”? Why the quick focus on a cross one of the soldiers is wearing?  What is the significance of the Bible passage read over the pile of corpses? What are the ghostly voices that are heard at one point above the trench? Why such comments by the soldiers as "There’s so many dead," "God isn't here," "We are still alive," "We’re dead, Charlie, I know that now," and Charlie Shakespeare’s exclamation as he leaves the trench after seeing all his dead comrades sitting around a fire — "I’m not dead!"? And what do we make of the German soldier at the very end waiting, with a knowing look in his eyes, for the next squad of British soldiers who are about to occupy the trench?

Zombie Film Convention:  The Living Dead Need a Shot to the Head to Be Truly Dead


Film enthusiasts will enjoy Deathwatch — even though it’s considered a fairly low-budget B film — not only for its combination of supernatural horror mixed with a WWI movie, but also for the parts played by actors such as Andy Serkis of Planet of the Apes and Lord of the Rings among other accomplishments, by Jamie Bell as the young and decent Charlie Shakespeare who had lied about his age to get into the army, and by Laurence Fox, whom I last saw as Inspector Lewis’s assistant in the spin-off of the Inspector Morse series. No spoilers, or not too many, I hope, in this short review, but I can’t help concluding with part of another poem this film brought to mind — the opening lines of Wilfred Owen’s “Strange Meeting”:

                        It seemed that out of the battle I escaped
                        Down some profound dull tunnel, long since scooped
                        Through granites which Titanic wars had groined.
                        Yet also there encumbered sleepers groaned,
                        Too fast in thought or death to be bestirred.
                        Then, as I probed them, one sprang up, and stared
                        With piteous recognition in fixed eyes,
                        Lifting distressful hands as if to bless.
                        And by his smile, I knew that sullen hall,—
                        By his dead smile I knew we stood in Hell.


By David F. Beer (with a little help from the Editor)

Sunday, October 27, 2013

The Big Issue of 1918

It Was About Bodies

Manpower was the big issue that shaped the campaign of 1918 and, ultimately, the end of the war before years' end.  Consider this chart in which all the figures up through the Armistice are the actual numbers.


By late 1917 the war of attrition was working.  All the countries in the war since 1914 were running out of bodies. The flood of American troops projected to arrive in 1918 and 1919 exercised a hypnotic power over both sides. The French were going to wait for the Americans, and late in the year event General Haig decided it would be imprudent to restart the Flanders offensive before the reinforcements arrived.

On the other side, Hindenburg and Ludendorff, whose staff had made similar projections, faced a dilemma after what seemed to them to be a pretty successful 1917 — Russia was out of the war, Italy very nearly the same after the Caporetto disaster, and they had held off the attacks in Flanders. However, they realized that they faced the same demographic issues as their long-time opponents. Eventually, despite the infusion of troops made possible by the ending of the war on the Eastern Front, they were inevitably going to be badly outnumbered on the Western Front. They faced three options:

1.  Use the troops available from Russia to dig in and wait for the Allies to attack them. This, they viewed as just postponing the inevitable.

2.  Negotiate a settlement. This option meant they would have to give up most of the occupied territory in western Europe. The two Crown Princes who commanded armies, Wilhelm and Rupprecht, supported this, but the generals found it unpalatable to turn things over to the diplomats.

3.  Go on the offensive and try to solve things before the Yanks arrived in force. This is the choice they made, and you know what ensued.

Saturday, October 26, 2013

The Aero-Naval War in Full-Color Illustrations


Among the different forms of warfare conducted between 1914 and 1918, one of the newest was the the combination of ships and aircraft. There were not a lot of photos that caught their interaction. Illustrators, however, were only constrained by their imagination. And, as you will see below, they were utterly captivated by the mixture of the planes, airships, and fleets of the combatants. Here are five selections from Tony Langley's collection.


Click on Image to Expand

This Idealized Fleet Seems to Have Everything


Click on Image to Expand


A German Seaplane Conducts a Rescue at Sea Under Fire


Click on Image to Expand

A Surfaced Submarine (British?) Firing on a Zeppelin


Click on Image to Expand


British Seaplane Stalking a U-boat


Click on Image to Expand


A Mine Has Broken Away from Its Mooring, Threatening the Convoy;
A Seaplane Fires on It


Click on Image to Expand

Friday, October 25, 2013

Weapons of War: The Story of Hiram Maxim, Father of the Machine Gun


Even though, in fact, more men were killed by artillery fire than by bullets in the Great War, the war is remembered and is most strongly held in our collective memory as a machine gun war. The man who gave the world the machine gun was an American inventor named Hiram Maxim.

Click on Image to Expand

Hiram Maxim (Lower Left) with an Early Model of His Gun; Above Is the Model Purchased by the British Army in the 1890s


Hiram Maxim's Story


Born in 1840 in Sangersville, Maine, Maxim was apprenticed at fourteen to a carriage maker. While learning that trade, he exhibited a knack for invention, designing a mousetrap that automatically reset and rid local mills of rodents. He obtained the first of his 271 patents at age twenty-six for a curling iron. By his thirties, Maxim was becoming chief engineer of the United States Electric Lighting Co. in New York, for which he introduced carbon filaments for electric light bulbs. At the 1881 Paris Exhibition, he demonstrated an electric pressure regulator and was awarded the Legion d'Honneur. That same year he arrived in England to reorganize the London offices of the U.S. Electric Lighting Company.

At the Paris Exhibition in 1881, a man told Maxim that if he wanted to make a fortune, he should invent a machine that would help these Europeans kill each other. Maxim did would go on to sell his machine guns to European countries on the eve of World War I, changing the nature of combat.

Maxim harnessed a bullet's recoil power to create a portable machine gun that needed only one barrel to fire all of its bullets automatically. In 1884, Hiram Maxim built the first effective machine gun, which revolutionized warfare. Its precursor, the Gatling gun, was a hand-driven, crank-operated gun with first six, later ten, barrels. Maxim's innovation was to harness the recoil power of each bullet, a force strong enough to eject the used cartridge and draw in the next one. Structured in this way, the portable gun needed only one barrel to fire all of its bullets automatically. To maximize the gun's effectiveness, Maxim also developed his own smokeless powder, cordite. In 1884, he founded the Maxim Gun Company in Britain to produce his new weapon. Five years later, he licensed it to the British Army in 1889; the following year the Austrian, German, Italian, Swiss, and Russian armies also incorporated it into their firearm auxiliary.

In 1896, the Maxim Gun Company was bought out by Vickers, Ltd., of which Maxim became a director. The Vickers machine gun would become standard issue of the British Army during World War I.


Click on Image to Expand

Maxim and His Grandson Examine a WWI-Era Maxim Machine Gun; The Diagram Below Shows All 66 Parts of Another Model


Later in life Maxim turned his attention from warfare to flight, building a steam engine-powered airplane that briefly rose from the ground. While he was unable to achieve sustained flight, his amusement ride, the Captive Flying Machine, became a staple of British fairgrounds. Maxim died on 24 November 1916, as the Battle of the Somme, where over one million soldiers fell in four months of machine gun warfare, was winding down.

Sources:  PBS Website; Tony Langley; Royal Artillery Museum

Thursday, October 24, 2013

24 October 1917 – Disaster at Caporetto:
The Opening Battle

How Did Caporetto Occur? 


The Caporetto offensive launched  24 October 1917 along the Isonzo River, is considered one of the most decisive victories of the 20th century. It was boldly planned, very ably organized, and well executed. While two Austrian armies, under General Svetozar Borojevic von Bojna, attacked the Italian Third Army on the Carso and Bainsizza Plateaus on the lower ground near the Adriatic shore, further north in the more mountainous  part of the Isonzo sector, the German-Austrian Fourteenth Army, targeted the Italian Second Army. Comprising the six German divisions and nine Austrian under German General Otto von Below, with Konrad Krafft von Dellmensingen as his chief of staff, the Fourteenth Army's masterful  double breakthrough proved decisive, annihilating the Second Army.

The assault stunned Italians troops and their commanders, who fell back in confusion: Below's van reached Udine, the former site of the Italian general headquarters, by October 28 and was on the Tagliamento River by October 31. . .The Italians [eventually] sustained about 500,000 casualties, including 250,000 taken prisoner.   How could such a catastrophe occur in so short a period?  The answer–I believe–lies in the faulty deployment by the Italian Commando Supremo. Even the anxious Italian King, who visited Caporetto a few days before the attack, expressed skepticism over the dispositions made by his generals. The map and photos below should demonstrate these weaknesses to you. 

Click on Image to Expand

Important things to note:  A.  The opening day's battlefield was huge, roughly 12 x 12 miles; B. The front line and the Italian defensive lines weave back and forth across the Isonzo (Soca) River; C.  The large gap between Italian 2nd and 3rd lines;  D.  Tight fit of all three Italian Lines west of Tolmino (8). 

Following the Map from Top (North) to Bottom (South)


  • Mte. Rombon (1) was the site of ferocious mountaintop fighting right up to the opening of the 24 October offensive. It marks the northern extent of the Caporetto battlefield. Occupied by Bosnian troops, it gave the German-Austrian forces an excellent view of their enemy's deployments before the operation.  Far below its peak on the river lies the village of Plezzo (2).


  • Plezzo (2) was just behind the front line of 24 October. The front here crossed the Isonzo, meaning attacking forces would not need to force a river crossing, simplifying things greatly for them. Here Austrian divisions and German gas officers would execute the most successful gas attack of the First World War, and charge through a huge opening that opened the road to Caporetto.  The photos below show the area today


Click on Image to Expand

The view from the 3rd Italian line above the river bend looking northeast toward Plezzo (2) along the narrow river valley. Mte. Rombon (1) is in the far distance. In this area the mountains are quite close on either side of the river.


Click on Image to Expand

However, just along the river near Plezzo (2), there are some low flat spaces. Italian forces deployed here were hit with a lethal gas barrage, allowing a clean breakthrough by Austrian divisions.  One of the dirty secrets of WWI is that gas attacks were effective when used intelligently.


  • Moving south past a big bend in the Isonzo is the town of Caporetto (3), the opening objective and namesake of the battle.  It is a road-hub at the head of a second valley (off to the right on the photo below) and its capture allowed the deep pursuit into northern Italy after the initial  rout. 


  • Mte Nero (4), at 2244 meters on the left of the photo, was on the front line on 24 October.  Three Italian divisions, the 43rd, 46th, and 50th, were deployed just below its peak and that of a second summit on Mte Mrzili (5). Heavy fog and rain on the morning of the battle obscured the vision of these units. South of Caporetto most of the Italian 2nd line and all of the 3rd line were on the opposite side of the river. By mid morning, unbeknownst to them, the three divisions on Nero and Mrzili were being flanked from their left (also left on the photo) by the enemy units that had broken through at Plezzo (2) and were marching down the river edge. This was not their only danger, though.


Click on Image to Expand

About 10 miles south of Caporetto (3) lies another river town, Tolmino (8). General von Below was executing a second breakthrough there.


  • Below is a spectacular view of Tolmino (8) from a hang glider above the Isonzo.  Once again the front line and 2nd and 3rd Italian lines cross the river at a perpendicular just north of the town.  Here the Italian positions were too tightly bunched. Both the town and the high hill to the right of the town–part of the Tolmino Bridgehead (7)–were occupied by  German troops, as was the hill to the left of town which offers a superb view down the valley towards Caporetto.  Once again the Central Powers were able to attack on both sides of the river at the same time. Additionally, a strong attack here had the potential of punching  through all three Italian positions very quickly; and an assault from the Bridgehead (7) could be mounted attacking downhill. It was a position of maximum danger for the Italian Army and maximum opportunity for their opponents.


Click on Image to Expand

For orientation purposes:  Just out of view to the left of the glider is Mte Mrzili (5) and over the pilot's left shoulder is Mte Nero (4);  ahead is Tolmino (8) in the center and the Bridgehead (7) is to the right; out of view on pilot's right is Mte. Kolovrat (6).


  • The attack in this area had three branches. Out of Tolmino (8): One German division attacking out of Tolmino  advanced along the river and headed for Caporetto (3).  This group would join up later in the morning with the group advancing from the Plezzo (2) breakthrough. The three Italian divisions deployed along the slopes of Mrzili (5) and Nero (4) were cut-off and captured en masse. Many of those troops did not fire a shot in the battle.  Caporetto (3), itself, was secured by 1600 hours. 


  • Also out of Tolmino (8), German Alpenkorps (including Lt. Erwin Rommel) crossed over advanced on the other side of the river up onto the Mte Kolovrat (6) range to reduce the strong points of the 2nd and 3rd Italian positions.  Over several days each of these strong points were eliminated.


  • The third group attacked out the Bridgehead (7) and targeted the right flank of the Second Army where its XXVII Corps was deployed.  A relief of units was in progress when the attack hit and the confused Italian forces were devastated.  


  • In summary, almost all the troops in the three Second Army lines were killed or taken prisoner in the early stages of the fighting.  Subsequently those troops in reserve and in the rear areas were threatened by a double flanking maneuver that quickly followed the initial double breakthroughs out of Plezzo and Tolmino. After capturing Caporetto, the northern Austro-German force pushed west, then south into the Veneto. Meanwhile,  the force that advanced out of the Tolmino Bridgehead also threatened the flanks of the remains of Second Army on one side of its thrust and the Italian Third Army on the other side.  This effectively collapsed the entire Italian position along the length of the Isonzo River, leading to the headlong retreat that is the hallmark and most remembered aspect of the Battle of Caporetto.


Click on Image to Expand

The view from an artillery position on the Italian 3rd line on Mte Kolovrat (6). The hill just below marked the 2nd line. Rommel captured a position there early in the battle.  On the left just across the river, the early slopes of Mte. Mrzili (5) where the Italian 46th Division found itself stranded can be seen.


If only one of the attempted breakthroughs had succeeded, the Central Powers would have certainly gained a major victory at Caporetto.  However, with both succeeding on 24 October, an entire Italian Army was wiped off the board.  The heartland of Italy was threatened, and the positions of mountain troops to the north of Caporetto and and the 3rd Army to the south along the Adriatic were made untenable. In Italy today "A Caporetto" is another name for a disaster. In future postings on Roads to the Great War we will discuss the pursuit that followed the double breakthrough, and how Italy–after a long retreat–stabilized the situation along the Piave River.


Wednesday, October 23, 2013

Richard Sorge: Soldier of the Kaiser, Master Spy of Stalin

Richard Sorge (1892-1944) was a disabled German war veteran, who became a communist and Soviet spy. He was ultimately hanged, but only after organizing the spy ring in Japan that gave Stalin the exact date of Operation Barbarossa and the Japanese plans to attack Pearl Harbor.


Richard Sorge (Left) with a Fellow Soldier, 1915

Sorge was an idealistic student in 1914 when the war broke out. He volunteered for the German Army on 11 August 1914 and was assigned to the Third Guards Field Artillery Regiment. After minimal training, he was rushed into action and sent to the Yser sector in Flanders – a member of the tragic "Student Battalions." He saw his first fighting by November. Soon began his alienation and hatred of war.  During the summer of 1915 he was wounded by Belgian counterbattery fire and was evacuated to Berlin.

After convalescing, he was sent to the Eastern Front, where he was again wounded. After another cycle of hospital care and convalescence, he returned to action near Minsk and was wounded a third time, the most severe episode yet – shrapnel wounds almost costing him a leg. This would result in a fateful  hospital stay near Koningsberg during which he met and had a romance with a nurse whose father was an ardent communist. He eventually left the hospital and the military with an Iron Cross, 2nd Class, a permanent limp, and a totally radicalized political ideology.

He later wrote: "The World War from 1914 to 1918 exercised a profound influence upon my whole life. Had I been swayed by no other considerations, this war alone would have made me a Communist."

Richard Sorge in 1917 had started down the road to becoming Joseph Stalin's greatest spy of the Second World War. A good summary of his subsequent career and his success as the leader of the Tokyo Espionage Ring can be found here:
http://spymuseum.com/spies/richard-sorge/

Tuesday, October 22, 2013

To Crown the Waves: The Great Navies of the First World War
Reviewed by James Thomas


To Crown the Waves: The Great Navies of the First World War

Edited by Vincent P. O'Hara, W. David Dickson, and Richard Worth
Published by Naval Institute Press, 2013

Often it seems that the war at sea during the Great War is so overshadowed by the massive slaughter on land that it becomes a footnote to the war, or at best of secondary importance to the "real war" in the trenches. Naval historians have long disputed this, of course. The editors of To Crown the Waves contend that the naval war was, in fact, the source of victory for the Allies over the Central Powers: ". . . once the land war stalemated on the western front, it was on the waves that victory was determined." (p. 2)

To make this point, To Crown the Waves is a collection of studies of the world's major navies. Each of seven chapters examines the navy of the nations whose navies made a major contribution to the war. Great Britain, France, Russia, the United States, Italy, Germany, and the Austro-Hungarian Empire are each represented, with an eighth chapter for other nations whose navies participated in some way. Each chapter is written by an historian who specializes in a particular nation's naval history and who reads the language of the nation they are describing.

To Crown the Waves Features Excellent Images and Data Tables


Click on Image to Expand

A Photo from Steve McLaughlin's Chapter on the Russian Navy


The chapters then follow a common organizational format. The advantage of this is that the reader can easily learn parallel information for each navy. Unfortunately, this makes the book more of a reference source than for reading cover to cover. That said, despite the potential problem multi-author works of widely varying writing quality can have, the editors of To Crown the Waves do a fine job of giving the entire book a common voice and thus utterly readable.


Order Now
The format for each chapter begins with a "Backstory," a quick history of naval development for each country up to the Great War. This includes the nation's naval mission, construction philosophy, and potential enemies. Next is "Organization," which includes command, but also logistical information and personnel. The third section of each chapter describes the subject nation's "Way of War." This is the real "meat" of each chapter, making the next section "Wartime Experience and Evolution" almost anticlimactic. The chapters are then wrapped up with a "Summary and Assessments." Throughout all the chapters are plenty of charts, maps, and photographs. All the chapters are well done, and this organization makes the material easily accessible.

To Crown the Waves is not perfect, however. In the chapter on the United States, for example, twice there is reference to "Texas class" battleships. USS Texas, BB35, and her sister ship New York, BB34, were actually New York class. Mistakes such as this are rare and are ultimately of little consequence to the greater value of the book. In fact, To Crown the Waves is an excellent, well-researched and thorough study of the world's navies as they collided in World War One. Does it prove the contention that it was the fight at sea that brought victory and defeat in the war rather than those final offensives of 1918? That is left to the reader to decide.

James Thomas