Now all roads lead to France and heavy is the treadEdward Thomas, Roads
Of the living; but the dead returning lightly dance.
Thursday, March 21, 2019
Map Series #4 St. Mihiel Offensive
Friday, December 8, 2023
Map Series #24—The Best Map I've Ever Found for the Anzac/Suvla Sector at Gallipoli
You might still need to enlarge this map or use a magnifying glass to read all the details contained, but I sure wish I had it available when I visited Gallipoli, especially for the Suvla Bay area. It was produced by the New Zealand Department of Lands and Survey in 1915, and it is especially good at showing the terrain.
Click on the image to enlarge it.
Wednesday, October 29, 2025
Saturday, June 15, 2019
Map Series #7: Closing the Gap at the St. Mihiel Salient
Map A
Click on Image to Enlarge
Source: New England in France, 1917–1919; A History of the Twenty-Sixth Division
By 0220, 26th Division units were entering Vignuelles.
Map B
Click on Image to Enlarge
For the story of the 26th Division scouts who proceeded the advance down Trenchee de Calonne go HERE.
Saturday, February 16, 2019
Map Series #2: A Handy U.S.-Oriented 1918 Map
Click on Map to Enlarge
- The major ports of the AEF
- General and Services of Supply Headquarters
- Coblenz, Center and Headquarters of U.S Occupation Forces
- Main rail supply lines
- Allied Advance and Armistice Lines for 1918
Wednesday, August 23, 2023
Map Series #20: The Fight for Belleau Wood
During the recent Centennial and afterwards, the American Battle Monuments Commission has been turning out a lot of fresh and helpful material on the American effort in the war. One item of which that has just come to my attention is a 2019 brochure on the fighting at Belleau Wood in 1918. It includes a great campaign map (more on that to follow), plus a concise history of the fighting, another map for a walking tour of the battlefield with information on each stop, notable participants in the battle, and additional information on other key sites in the Château-Thierry vicinity. The full pamphlet can be downloaded HERE.
Nonetheless, the "star" of the publication is this map delineating all the major actions of the three-week battle. Besides the main assault on Belleau Wood, it shows the 6 June flank attacks on Hill 142 and Bouresches, the supporting operations of the 2nd Division's 3rd Brigade, and the positions and main attacks of the German forces. I've read several works covering Belleau Wood and visited the battlefield over a dozen times, but this map clarified the conduct of the fighting there in a new way for me. It's a cartographic tour de force.
Click on Image to Enlarge
(Size: Display = 580px; Download = 1200px)
![]() |
Monday, May 13, 2019
Map Series #6: The Isonzo Sector of the Italian Front
Click on Image to Enlarge
Thursday, February 8, 2024
Map Series #25—America As New Prussia
Click on Image to Enlarge
Display=580px, Large=1060px
![]() |
| Life, 10 February 1916, Front Cover |
[Note: Please enlarge this map. Some of the cleverest humor is in the selection of new names for U.S. cities.]
Germany might pose a future threat, and that a failure to prepare for war might lead to dire consequences. As the map illustrates, Germany and its allies were not the only potential adversaries: there were also concerns regarding Japan’s strength amid increasing tensions in the Pacific. None of these scenarios came to fruition. The United States ended up fighting on the same side as Japan, and while Germany did become an enemy, the chance of it successfully subjugating the United States had always been slim. But the fantastical nature of the map was surely part of its appeal, for this cover image was undoubtedly intended to be humorous, as a glance at some of the place names—including "Kuturplatz," "Hyphenburg," and "Goosestep"—reveals.
What was Life satirizing here, and what were its readers supposed to be laughing at? By using humor, the magazine may have been mocking overblown fears of invasion, and perhaps even undermining the arguments of those who advocated preparedness.
However, when this image is read alongside the magazine’s editorials—which consistently pressed for preparedness—it becomes clear that Life was also making a serious point. Life’s editors, alongside a growing number of other Americans, believed that the United States needed to be able to defend itself against foreign threats. An invasion may have been unlikely, but it was not entirely implausible. If Germany defeated Britain on the Western Front, there was a risk that Canada, a British Dominion, might fall into German hands, which in turn would severely threaten American security.
Life’s arresting cover image reflects how widely the Great War pervaded American culture, even before U.S. intervention in April 1917. From the moment it broke out in Europe in the summer of 1914, the war provoked discussion and debate in American publications, and the nation’s citizens became acutely aware of developments on the other side of the Atlantic.
Despite this, there have been relatively few works which deal in depth with how the war affected the United States between 1914 and 1917. As the historian Jennifer Keene has recently argued, "too often, discussions of America’s road to war become focused nearly exclusively on Woodrow Wilson’s decision making."
The social and cultural dimensions of the neutrality period—and especially the responses of the American public during these years—remain under-explored, and there is no historical consensus regarding the extent to which the American people supported intervention before April 1917.
Source: "Humour, neutrality, and preparedness: American satirical magazines and the First World War, 1914–1917," by Vincent Trott, War in History, Vol. 29, 2016
Sunday, April 25, 2021
Map Series #19: Le Hamel 4 July 1918
When I was researching my recent article on General Fuller and tank warfare, I discovered he had included this very helpful map on the battle of Le Hamel, which is considered a tactical masterpiece by General Monash and an example of where the potential of the tank was on full display. This map is exceptional because it shows where the tanks were deployed at the opening of the attack.
I have supplemented the map with three photographs which will help the reader appreciate the terrain, which, to me, looks just perfect for tank warfare. Please note the directions. North is to the left; the attack was mounted from west (bottom) to east (top). C is the
A. Australian Front Line
A-B. No Man's Land
B. German Front Line
C. Final Objective (Looking West from the Site of the present day Australian Memorial.)
Click on Images to Enlarge
To learn more about this interesting battle, read our article here:
https://roadstothegreatwar-ww1.blogspot.com/2020/07/battle-on-4th-of-july-le-hamel-1918.html
Thursday, April 4, 2019
Map Series #5: Verdun 1917
Click on Image to Enlarge
Saturday, January 26, 2019
Map Series #1: The Battle Fronts of Europe
This begins a new occasional series on Roads to the Great War
Click on Image to Enlarge
Wednesday, July 20, 2022
What Happened at the First Battle of Artois?
![]() |
| Depiction of the Fighting Durint the First Artois |
There is a piece of the Western Front, running north of Paris to the Channel, principally entailing the department known at the Pas de Calais. The heart of the Pas de Calais is a district known as Artois, the largest city of which is Arras, about 110 miles north of Paris. Further north from Arras is a series of ridges known as the de Lorette Heights. A chap named Napoleon Bonaparte, who knew something about battlefields, once said, "Whoever dominates the de Lorette Heights commands France." This was validated, by the way, in 1940, when the last big effort of the Allies to stop the German Panzers was defeated in the shadow of these ridges and the Germans quickly got to the Channel and turned on Paris. France soon fell. In World War I, though, Marshal Joffre fully understood the importance of the heights and launched the first post-trenches attack of the war here in late 1914.
![]() |
| The Action Described Here Was at the Very Top of the Map |
On the night of 4 October 1914 Bavarian Infantry had taken possession of the flat-topped Hill 165—already known locally as Notre Dame de Lorette— which had been left almost defenseless by the French during the "Race to the Sea." A chapel, built when the hill was a site of sacred oratorios, was turned into a bastion. The surrounding villages were also well fortified by the Germans and connected via underground passageways.
There followed three subsequent distinct battles around Notre Dame de Lorette identified as the Battles of Artois, though accounts of their precise dates and results differ between the French and British versions. The first these began on 26 October 1914 with a series of German attacks and French counterattacks which kept Notre Dame in German hands. The collection of actions which ensued are generally categorized historically as the First Battle of Artois. Some sources discount the October fighting and place its start as 17 December 1914. There also seems to be some disagreement about the conclusion of the fighting since fighting on the plateau continued intermittently right up until the next major French offensive in May 1915, the Second Battle of Artois.
![]() |
| The Prewar Chapel on de Lorette Height |
Early in December 1914. the tactical situation did change with the arrival of several units of French heavy artillery, whose fire compelled the Germans on Lorette ridge to take cover in their deep dug-outs. The French Higher Command ordered the XXI. Corps, which had held the Lorette sector since its stabilization, to attack in the hope of a breakthrough. The Corps commander, Gen. Maistre, was doubtful of the success of the operation proposed, judging the means insufficient and the obstacles to be encountered too strong. Nevertheless, the attack took place on 17 December on a front of a mile and a quarter, with diversions against other German strong points in Artois. Near Lorette, the artillery preparation had not been sufficient to prevent the assaulting troops coming under heavy fire, especially from machine guns, as they left the trenches. The German wire was strong and had been very little cut. Nevertheless, the attacking Poilus struggled on through deep mud, and succeeded in taking some trenches. For four days the operation was persisted in. The artillery support was weak, partly because of the winding, irregular front line, partly through insufficient liaison with the infantry. Against such handicaps the infantry strove bravely but in vain. At last, after murderous losses which justified only too well Gen. Maistre's forebodings, the main attack was broken off.
![]() |
| German Trench on de Lorette Height |
In the afternoon of December 27 ten battalions of Chasseurs Alpins, commanded by Gen. Barbot, attacked the hamlet of La Targette to the south [see map], after two hours of artillery preparation. "No-man's-land" here was a quarter of a mile wide, quite flat, and without cover save for a single sunken road. Hence losses were heavy and onlv half a mile of first-line trenches were taken. A nearly unbroken series of minor operations took place throughout the winter and early spring.
![]() |
| Believed to Be an Authentic Photo of a French Attack on de Lorette Height |
As the winter went on, the sticky mud became even worse, and the heavy German trench-mortars added still more to the danger and discomfort of the trenches. On 3 March at dawn, after a short but violent preparation by heavy artillery and heavy trench mortars, an entire German division made a sudden attack along the crest of the ridge, and drove the French into Buvigny wood. Two days of counterattacks recovered most of the ground lost, and throughout March and April a series of local attacks and counter-attacks slightly improved the French position at a cost in casualties disproportionately severe in comparison with the ground gained. The dead were not all Frenchmen. Already the German troops were beginning to call the ridge "Tolenhugd," the Hill of Death. A second general attack (Second Battle of Artois) was mounted in May 1915 that secured Notre Dame de Loreette and even included a penetration to distant, Vimy Ridge that was, however, quickly beaten back by the Germans.
![]() |
| Preserved Trenches from the 12–15 Fighting |
Except for the 1917 Canadian victory at Vimy Ridge, the Artois and de Lorette Heights are one of the neglected battlefields of the Great War in most English-language sources. For some reason, these intense battles lack the "sex appeal" of Flanders or Verdun for historians. However, consider this—on the crest of Notre Dame de Lorette rest the remains of 40,000 Frenchmen in France's largest war cemetery and ossuary, and a magnificent basilica on the site of the original chapel. Alongside them is a massive new elliptical monument, something in the character of America's Vietnam Memorial, with the names of all the combatants of all nations who fell in Artois and French Flanders listed. There are 580,000 names on that monument, including some Americans. An impressive section of the 1914–15 trenches have been preserved on the site as well.
![]() |
| Notre Dame de Lorette Today During 1914–15, the French Would Have Been Attacking from the Upper Left (West) [Click on Image to Enlarge] |
Sources: Encyclopedia Britannica, 1922; Webmatters
Friday, October 18, 2019
Map Series #10: The 5th Division, AEF, Crosses the Meuse
![]() |
| Very Early and Just-Completed Monument to the 5th Division's Meuse River Crossing Note Meuse Heights in Distance |
Click on Image to Enlarge
Wednesday, May 6, 2020
Thursday, March 12, 2026
Map Series #29—Von Spee's Blunder at the Falkland Islands
| SMS Leipzig Under Fire at the Falklands |
Sunday, March 3, 2019
Map Series #3: The 1915 Battles in the Champagne
Click on Image to Enlarge
For some additional details on the battles visit our earlier articles:
First Champagne
Second Champagne
Saturday, November 23, 2019
Map Series #12: Where the War Stood in August 1916
Russia fared poorly, losing control of territory in what is now Poland, Ukraine, and the Baltics, while Serbia had been overrun. Fighting on the Western Front and in Italy had accomplished essentially nothing beyond what the Germans had managed to achieve before the Battle of the Marne. The tiny blue line near Salonika in Greece represents a small Allied force that had seized the city to try to maintain a token force in the Balkans. Their presence embroiled Greek politics in crisis but had little military significance until the Central Powers were on their last legs.
Click on Image to Enlarge
Saturday, September 7, 2019
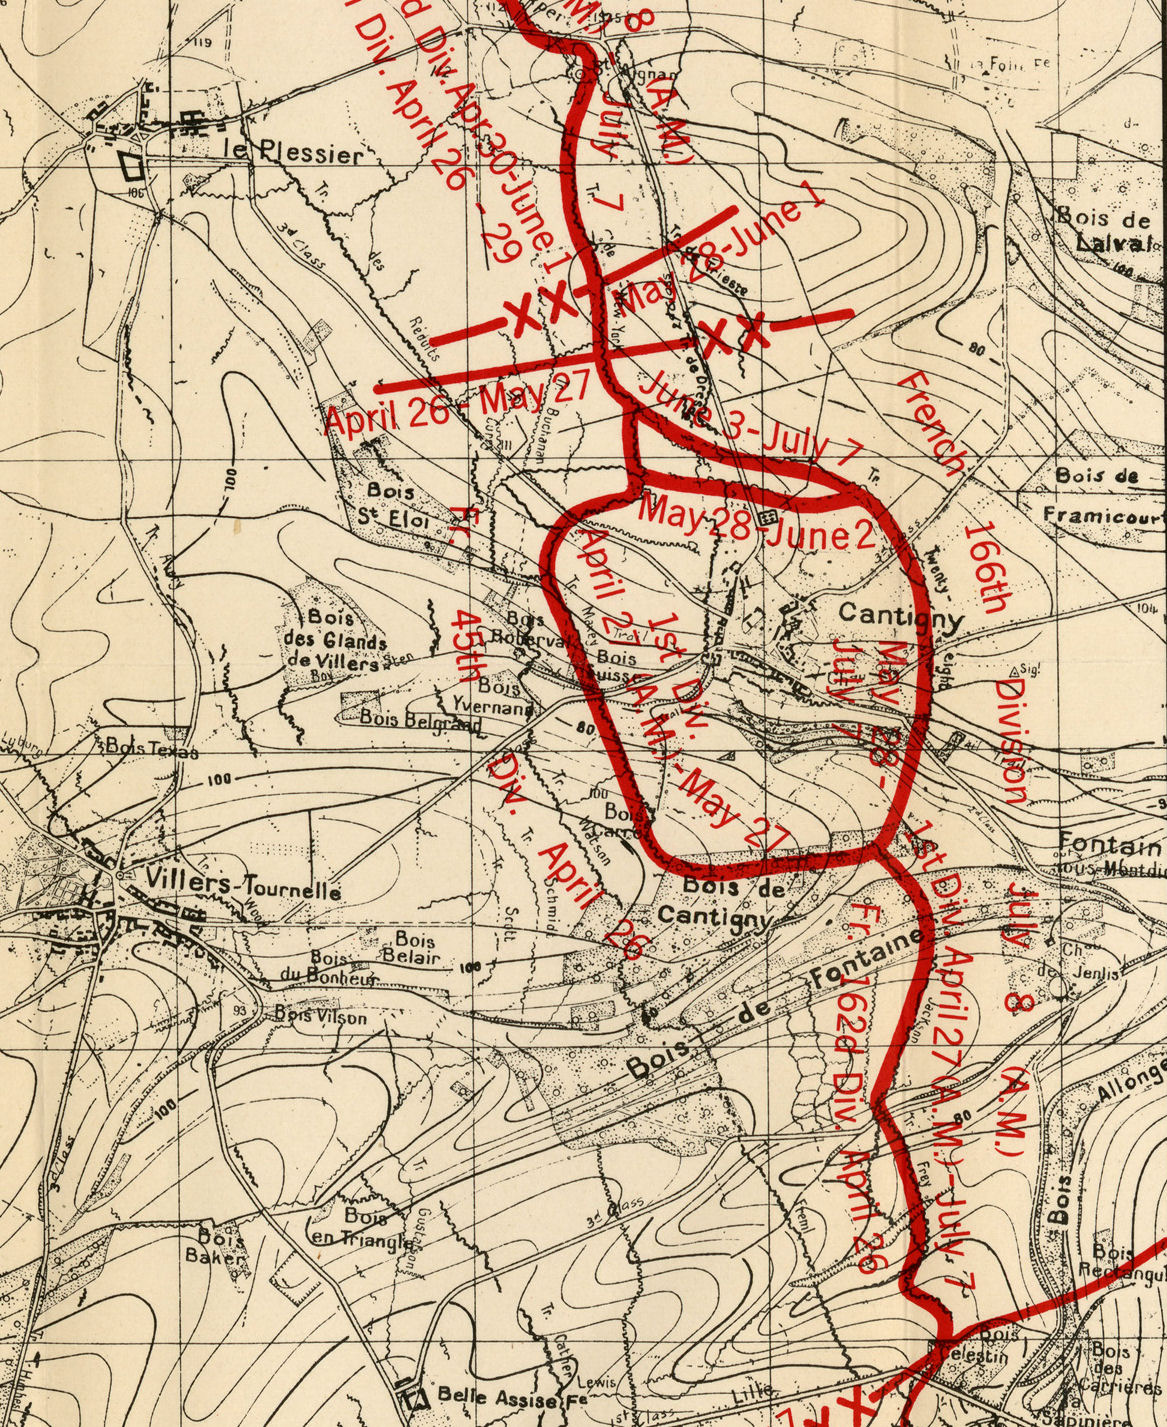
Map Series #9 The First Division at Cantigny
Click on Image to Enlarge
Saturday, August 3, 2019
Map Series #8: The Great War in East Africa
Click on Image to Enlarge
Saturday, July 6, 2024
Map Series #26 Italian Progress on the Isonzo/Carso Sector
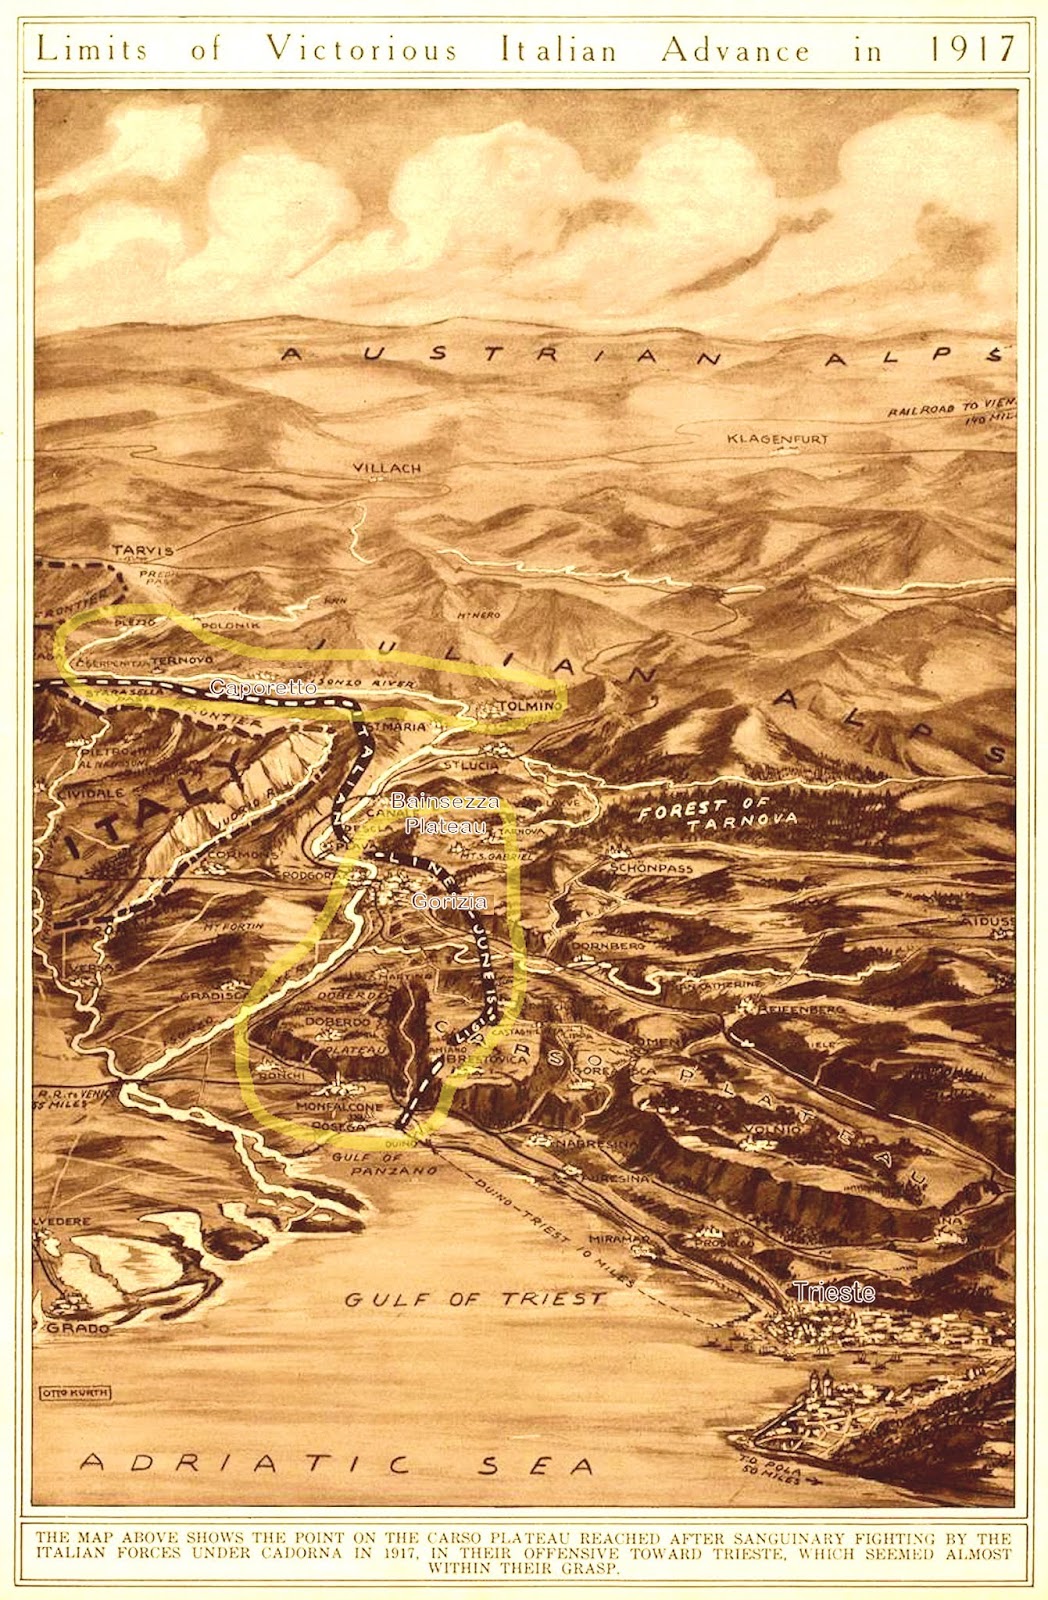
The battles of Isonzo represented Italy’s main offensive efforts against the Austro-Hungarian Empire during World War I. The 11 battles took place between 1915 and 1917 along the Isonzo River in northeastern Italy. The results were usually high losses on both sides without relevant strategic results. The strongest emphasis in the 11 battles was on advancing across the Carso Plateau, the gateway to Trieste. This map shows the pattern of advance for the Italian Army over two and a half years of campaigning. See our major article on the fighting on the Carso HERE.
Click on Map to Enlarge